Overview
Effortlessly handle student enrollment in groups, assign Group Leaders, manage course subscriptions, and view student progress reports per course with the comprehensive Group Registration plugin for LearnDash.
Installation, Activation, and Prerequisites
Before getting started with “Group Registration”, please ensure you have the LearnDash LMS plugin installed and activated, that your site meets or exceeds our prerequisites, and you have the add-on properly installed and activated.
Getting Started with WooCommerce
-
-
- As mentioned before, make sure your LearnDash LMS plugin is installed and activated.
- Install WooCommerce: You can do this by navigating to Plugins > Add New > Search for WooCommerce in the WordPress plugin repository > click Install and then Activate.
- Install the LearnDash WooCommerce integration following this guide.
- Now install the Group Registration plugin and activate it.
- Go to Plugins> Add New
- Click Upload Plugin
- Browse for and select the file that you downloaded after purchase. It will be in a .zip format.
- Click Install Now
- Click Activate Plugin
-
NOTE: You can also download the copy of the plugin from your account.
Setting up your Group Registration:
Create a Product:
- Make sure you have followed all the steps of the WooCommerce set up guide (is activated when WooCommerce is activated)
- Now you are ready to start creating Products.
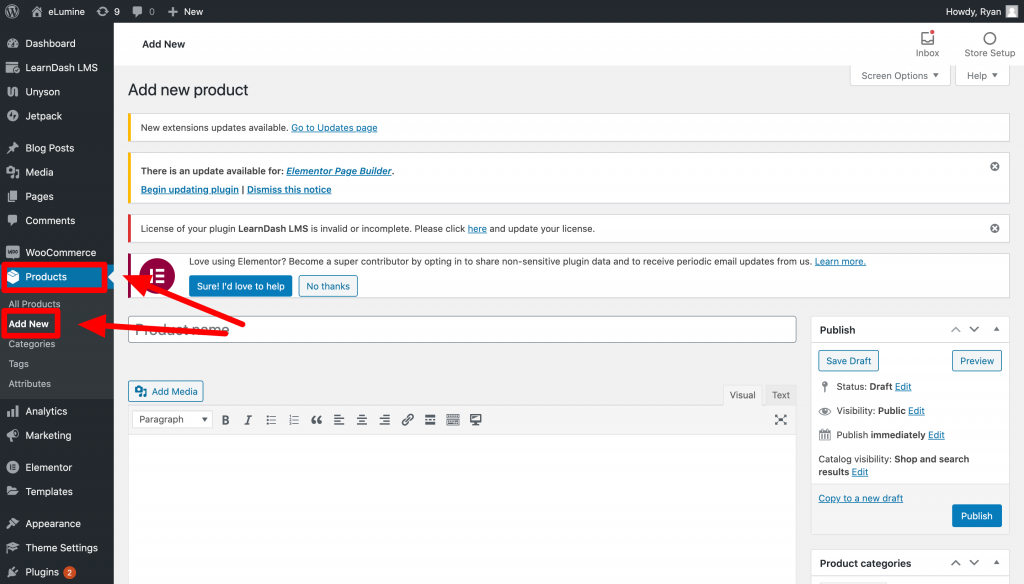
- Navigate to Products > All Products > Add New.
- Add the name of the Product.
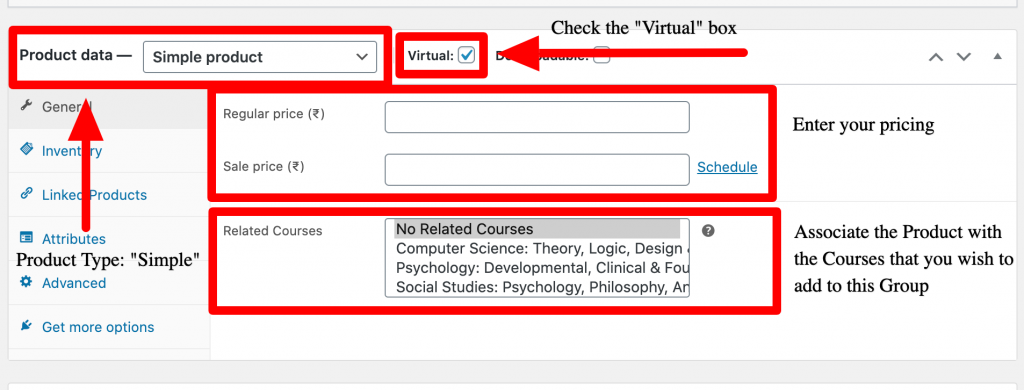
- Select the Product Type as Simple Product.
- Select the Virtual checkbox next to Product type.
- Fill in the price details.
- From the Related Courses Section, associate the Group Product with the Courses you wish to add to this Group.
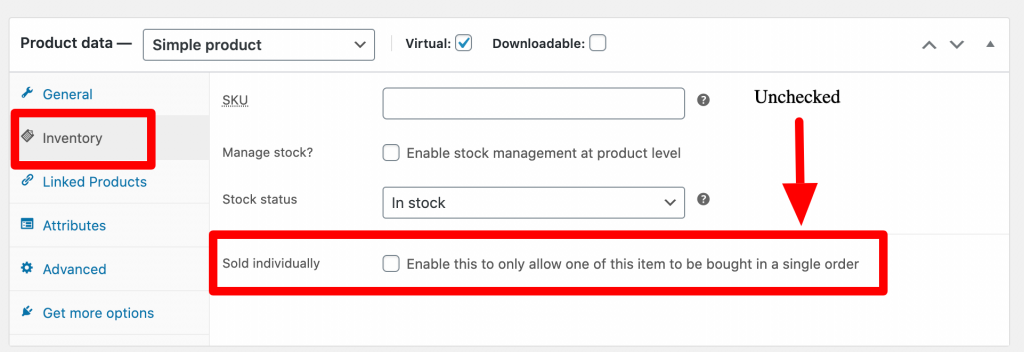
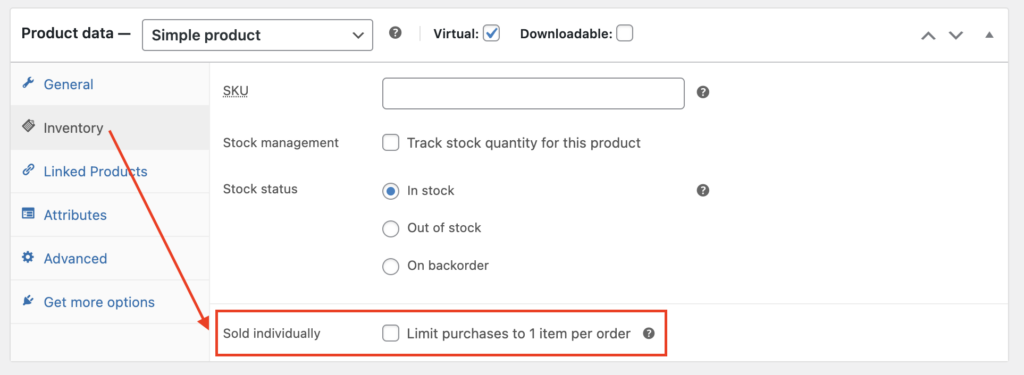
- Go to Inventory > Make sure the Sold Individually checkbox is unchecked.
Group Registration Settings:
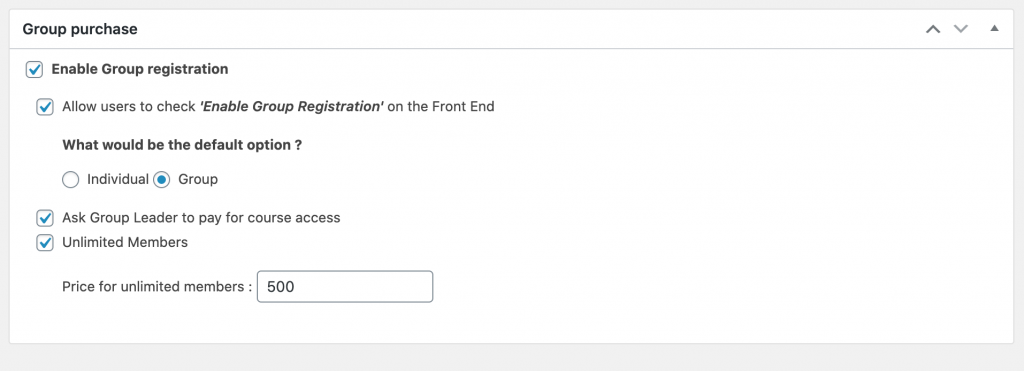
- Once you have completed the steps above, scroll to the bottom of the Edit Product Page.
- There is a checkbox called Enable Group Registration checkbox.
- Check that setting and a bunch of other settings will appear.
- The Allow users to check Enable Group Registration on the Front End will allow the users to select whether they want to purchase an Individual or a Group Product when they visit the Product Page. (Note: If the Group Leader wishes to add more seats to his/her Group, he/she will just need to purchase the required number of seats of the same Product.)
- The Ask Group Leader to pay for course access setting will force the Group Leader to pay for his/her seat as well.
- The Unlimited Members Setting allows the user to purchase unlimited seats, and also allows you to enter a price for the same.
- Once you have configured these settings according to your specifics, you can go ahead and Publish the product.
- Your Group Product is now ready.
Creating a LearnDash Group Product and Assigning a Group Leader
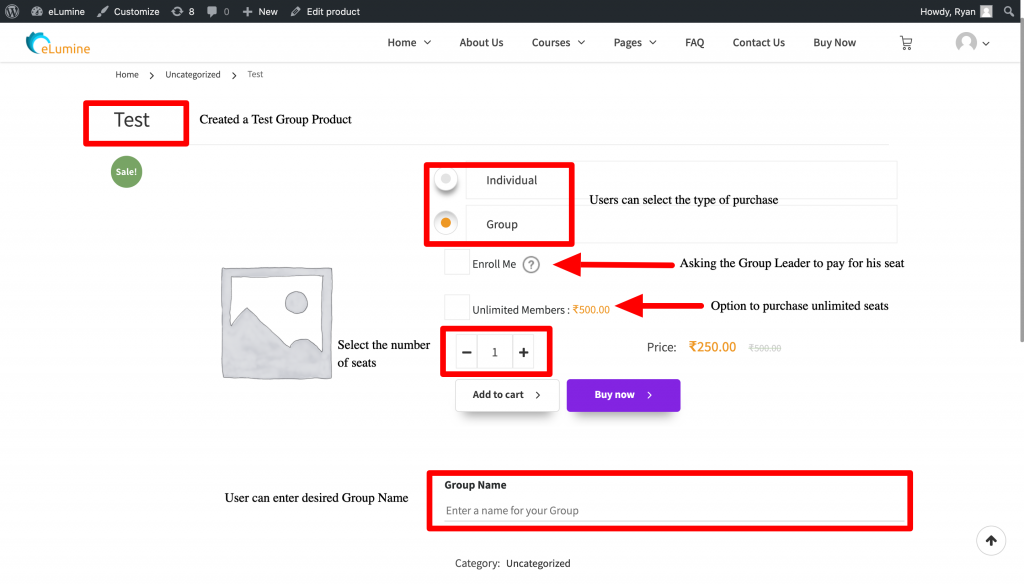
- Once the product is created and published, you are ready to view the Product on the front-end and so are the users on the site.
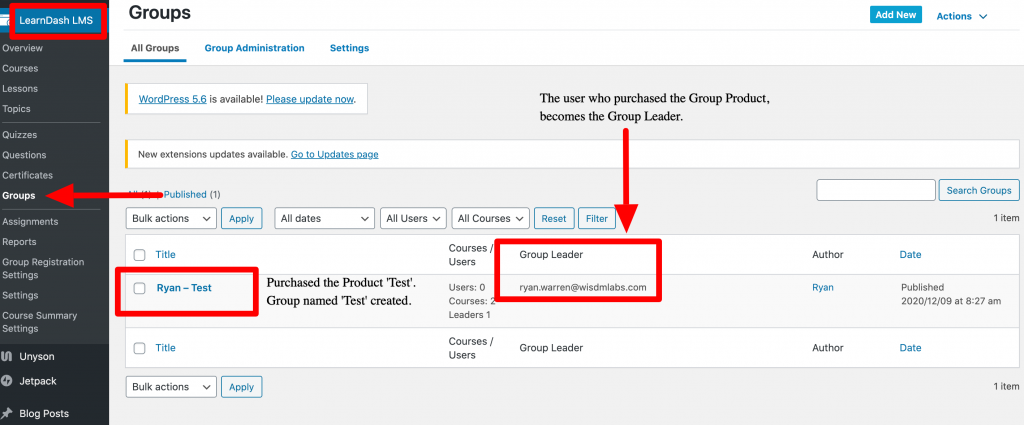
- Once a user purchases the Group Product created by you, that specific user becomes the Group Leader.
- Once the purchase is complete, a Group (with the Group Name if the user has entered it) with the default name same as the Product is created. This happens automatically.
- You can check the auto-created Group on the backend of your WordPress under LearnDash LMS > Groups.
Managing Groups as a Group Leader
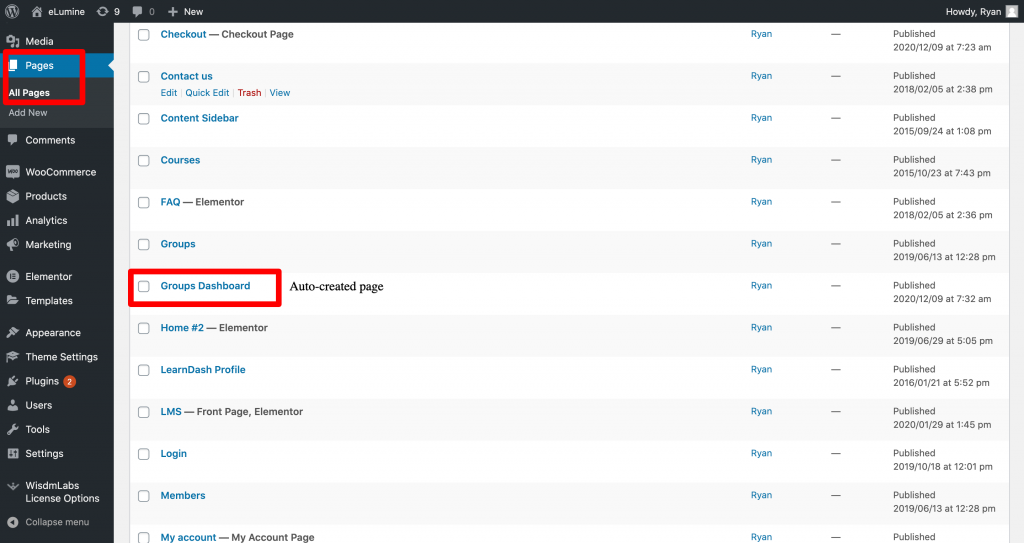
- Once you activate the WISDM Group Registration Plugin, a Page (in your WordPress backend, under Pages > All Pages) is created automatically with the name Group Dashboard.
- In case the page was not created, you can simply create this page by navigating to Pages > Add New, then select a shortcode block and add the shortcode[wdm_group_users]
- Note: Only the administrator and/or Group Leader can view the above-mentioned page.
- The administrator can see all the Groups with all the users enrolled in those groups on the Groups Dashboard Page. This is because administrators are Group Leader of all Groups by default.
- The Group Leader will only be able to select, view and manage the Groups that he/she is group leader of.
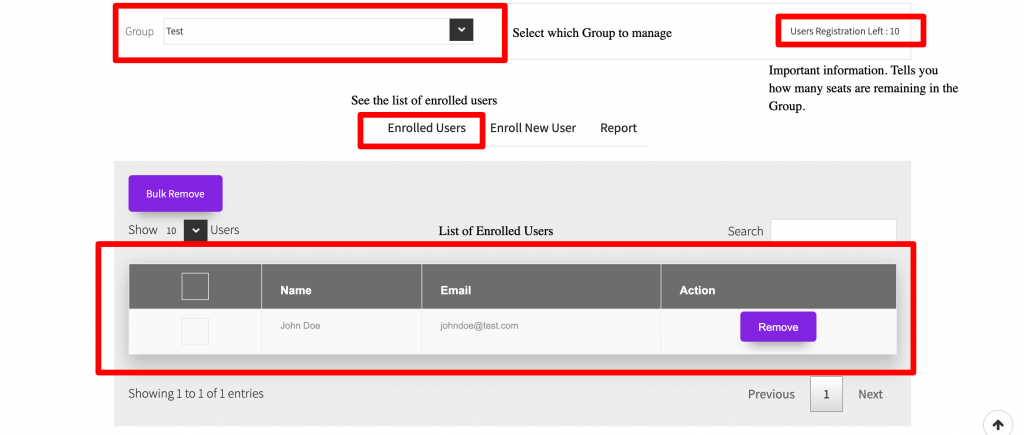
How to Use the Groups Dashboard?
- The setup of the Groups Dashboard Page has been explained above. It is extremely simple, just add a new page under Pages on your WordPress backend and add a shortcode block with the shortcode[wdm_group_users]
- Once the Group Leader views this page, there is a drop-down menu that will help the Group Leader select which group he/she wants to view/manage (incase the Group Leader is a leader of more than 1 Group)
- Once, the Group Leader selects the Group he/she wants to view, the User Registrations Left for that particular group is shown under the name User Registrations Left:
- Now, there are 3-4 tabs the Group Leader can see on the Groups Dashboard Page depending on other settings. (If Group Code is turned on 4 tabs are seen)
- The Enrolled Users Tab:This tab will essentially show the Group Leader all the Users enrolled in the particular Group and will also allow him/her to search for enrolled users and also remove or send invites to the enrolled users.
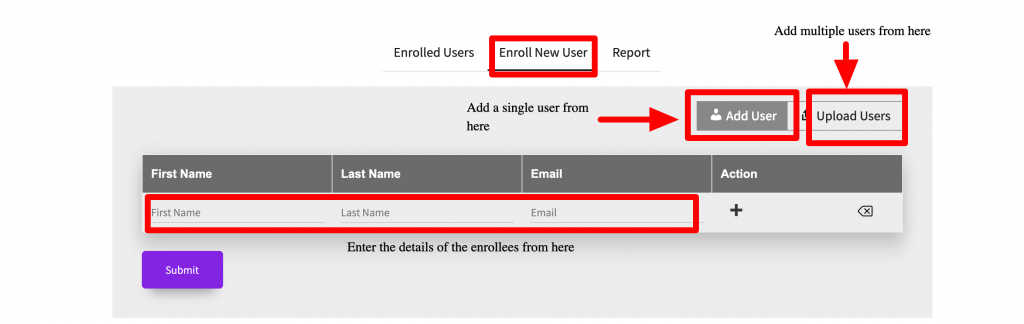
- The Enroll New User Tab:As the name suggests, the Enroll New User tab allows the Group Leader to enrol new users into the group selected wither individually or in a bulk-upload fashion using a CSV file. While enrolling it allows the Group Leader to enter the first name, last name and the email address of the enrollees. CSV upload is toggled from the Upload Users tab within the Enroll New User Tab.
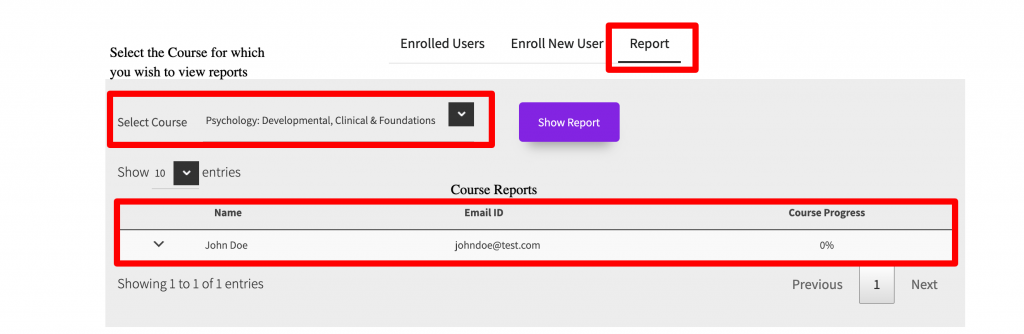
- The Report Tab:This tab allows you to view student reports. All the Group Leaders need to do is select the which Course they want to view the student reports for using the drop-down menu within the Report Tab. A list of students with their reports will appear.
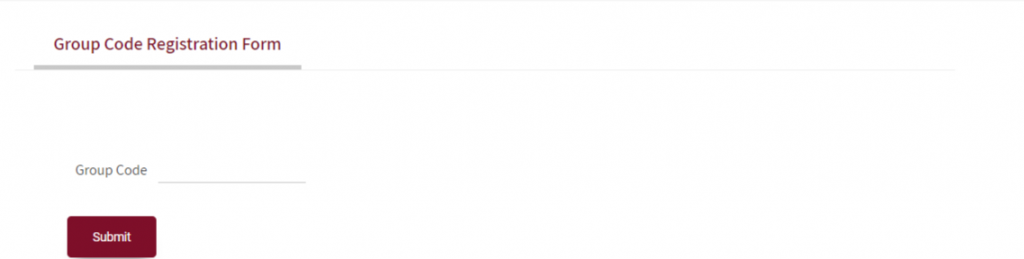
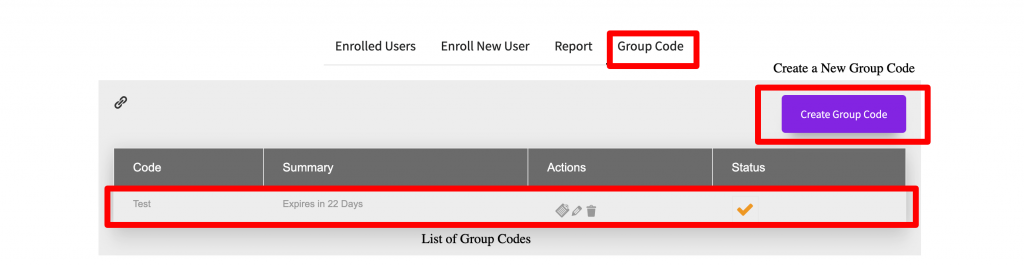
- The Group Code Tab (only appears if the Group Code Setting is activated under LearnDash LMS > Group Registration Setting > Group Code): This tab allows Group Leaders to create Group Codes for specific groups. The Group Code can be shared with users who can self-register using the Group Registration form.
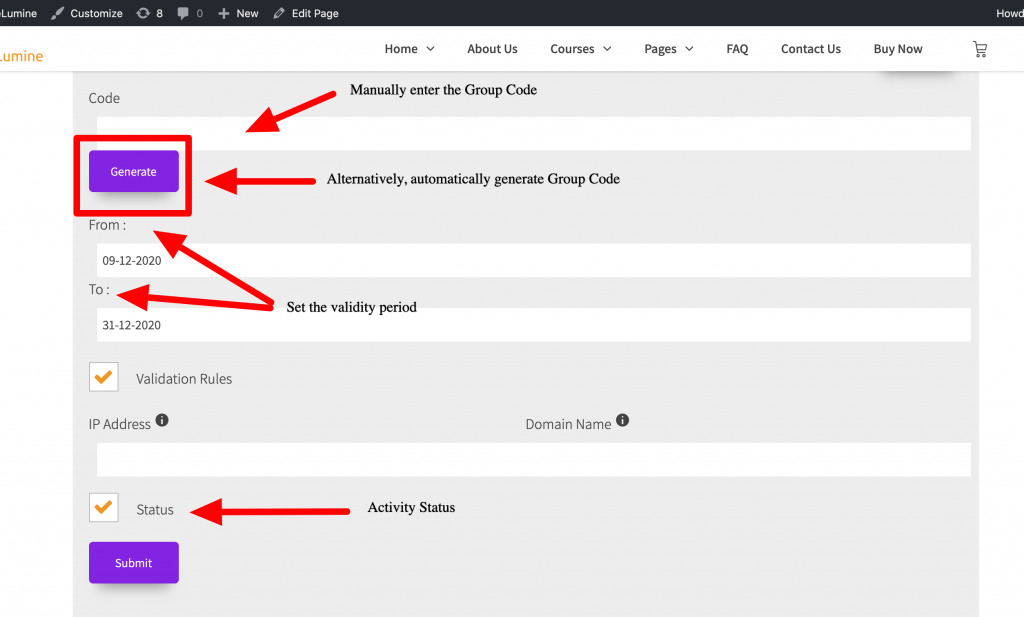
Once the Group Leader clicks on the Create Group Code Button, a bunch of settings open.
The first one is the name of the Group Code, where you can manually enter it or Generate a new one.
The From & To is to define how long will the Group Code will be valid for.
The Validation Rules setting is to define which IP Address and Domain name you want to restrict the user registration to.
The Status Setting is just to activate/deactivate the Group Code at any time. - Note: If the User Registrations Left: is zero, the Group Leaders will not see the Enroll New User Tab. In this case the Group Leader can just purchase more seats of the same Product and the seats will automatically be added to their Group. Or, the admin can edit the Group and increase the Registrations from the Group Registrations Left: field.
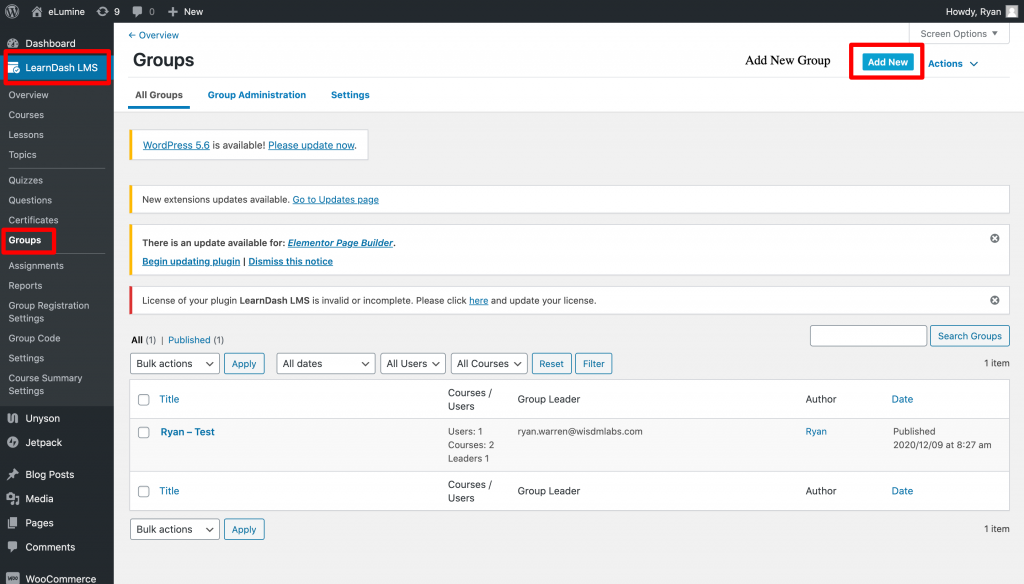 Add a New Group
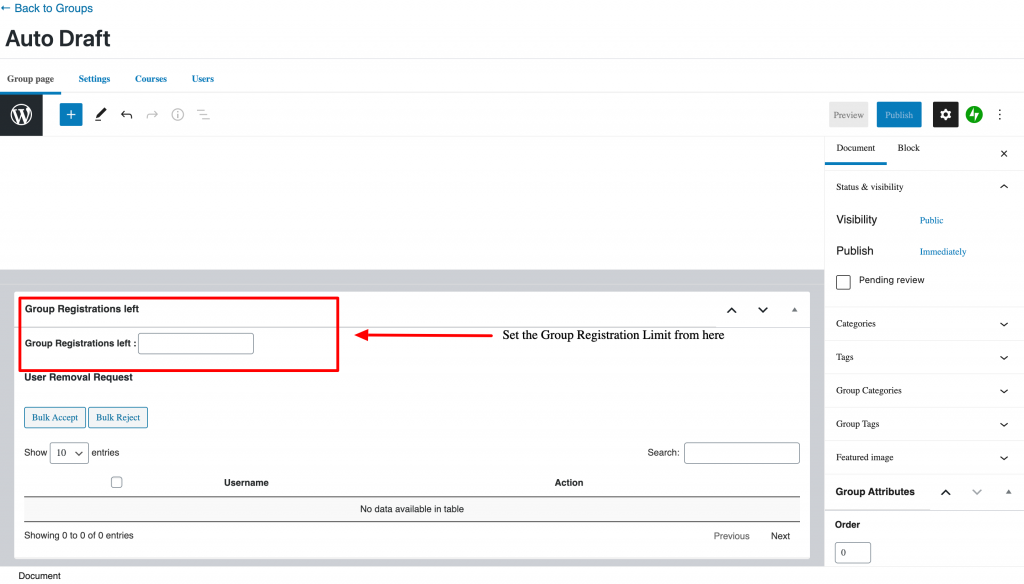 Set the number of seats for the Group
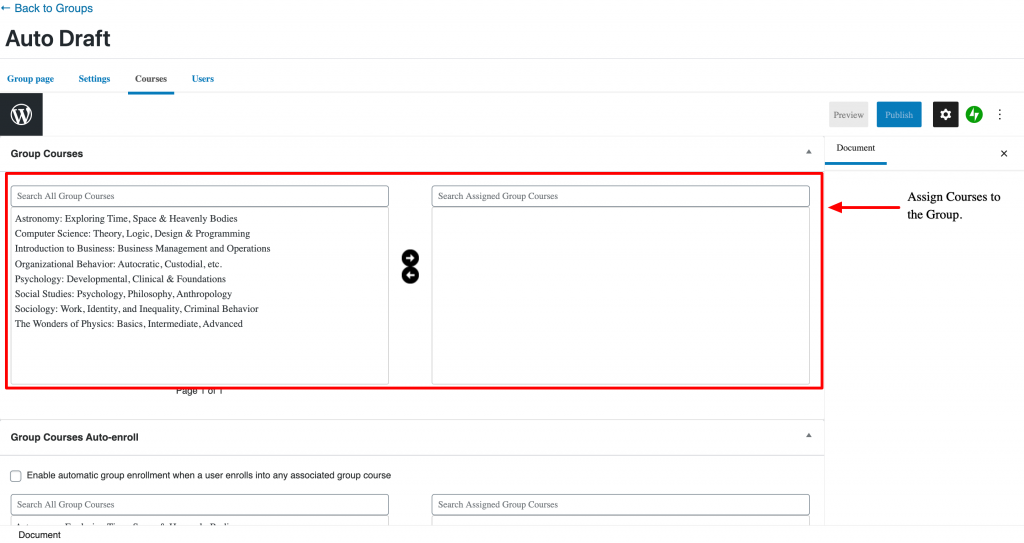 Add Courses to the Group
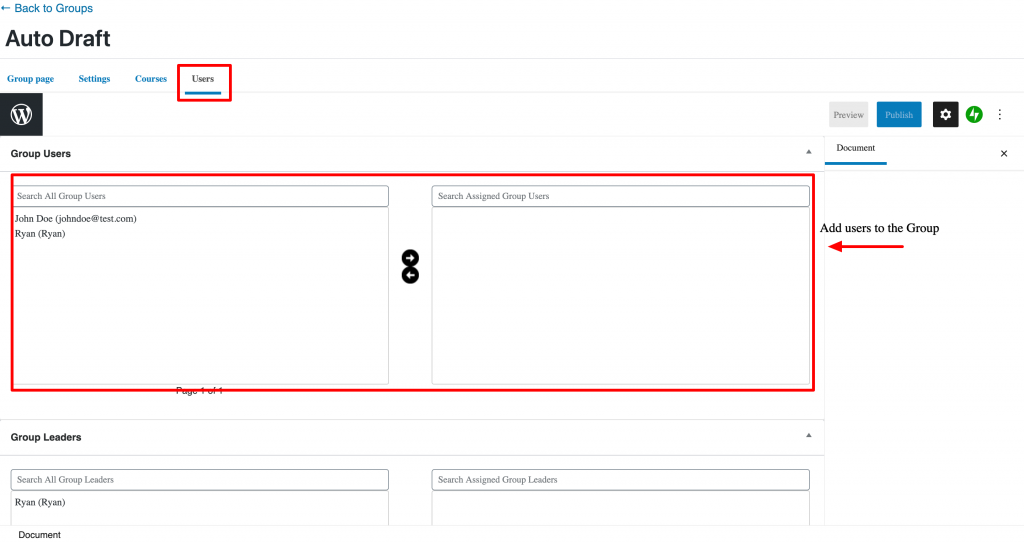 Add Users to the Group
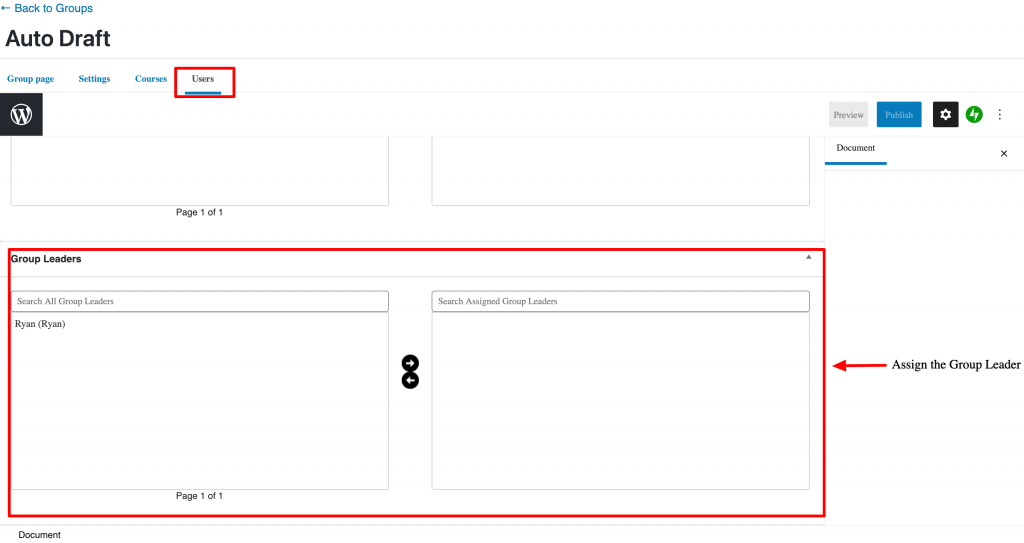 Assign the Group Leader of the GroupHow can Admins add/remove users and/or the number of seats in a Group:Prior to the Group Reg. For LearnDash v4.3.8, there was a Seats Left Count on the Edit Product Page as shown in the screenshot below. Using this the admin could control the number of seats leftin the group as opposed to controlling the Total number of seats in the group:
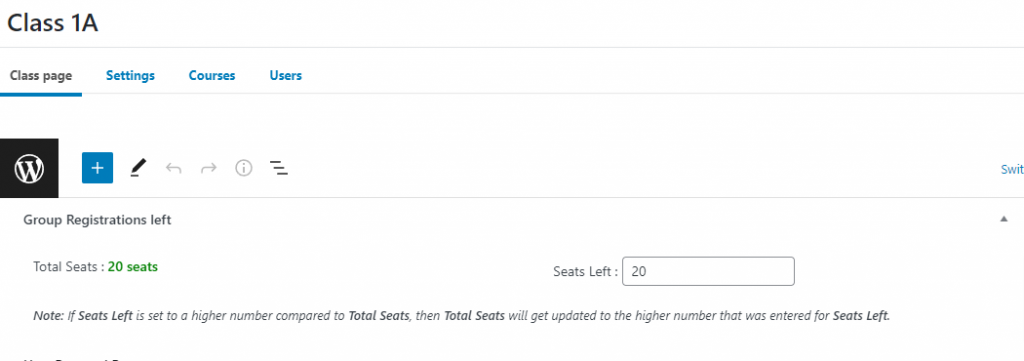 Old Screenshot for Group Registration Left Metabox on Group Edit PageIn the v4.3.8 update we added a new field called the Total Seats Field. This new field/count was introduced to make sure admins can easily control the Total Seats and in-turn the Seats Left in the group as well as do the same for an existing group that has already been purchased by a Group Leader.
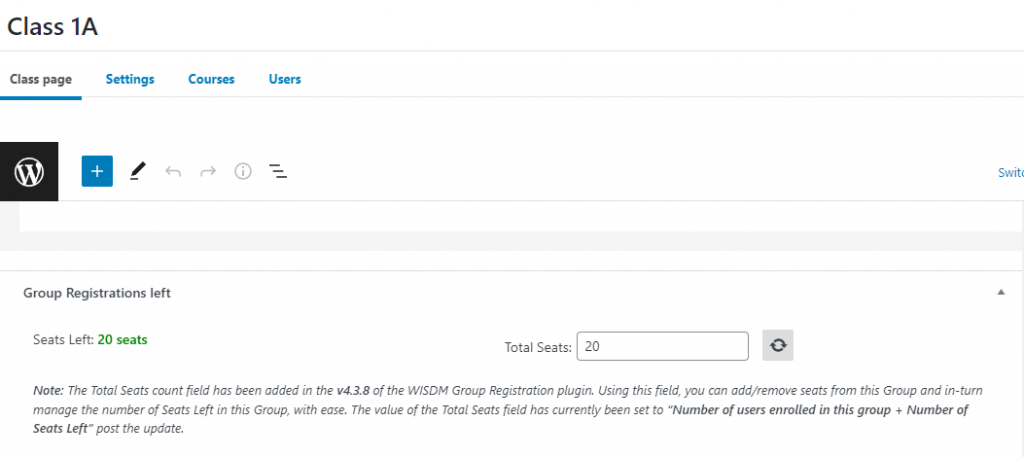 New Screenshot for the Group Registration Left Metabox on Group Edit PageHeres how it works:Create or Add SeatsLets say you, as an admin, are creating a new group:As soon as you name the Group on the Edit Group Page, you will see an editable Total Seats Field.Lets assume you need 50 seats in the group, and hence, you enter the number 50 in the Total Seats field and hit Save.This will add 50 seats to the Group and save the Seats Left Count (this field is not editable) as 50 to indicate that the total seats left to register are 50 (since this is a new group and no user has been enrolled as of yet).Now, if your Group Leader has enrolled 50 seats and needs more seats to be added to the Group to enroll more users to the group:In this case, since all 50 seats are registered, the Seats Left Count will be 0.Now, lets say the admin edits the Total Seats and changes it from 50 to 55.Now, since 5 additional seats were added, the Total Seats count gets updated to 55 and the Seats Left count will automatically change to 5.Remove SeatsLets say you, as an admin, need to remove seats from an existing Group:Lets assume you have a Group that already has users enrolled and being managed by a Group Leader from the Groups Dashboard.Lets say this Group Leader purchased 50 seats initially and has registered 45 users in the Group.This means that the Total Seats Count is now set at 50 and the Seats Left Count is now set at 5.Now, lets assume that you as an admin need to remove a few seats from this Group:If the number of seats you are removing is lesser than the Seats Left in the Group:For example: You choose to remove 4 seats and hence edit the Total Seats field and change it from 50 to 46. In this case, since the number of Seats you are removing (4) is lesser than the Seats Left in the Group (5), the Total Seats will get saved as 46 and the Seats Left will automatically change to 1.If the number of seats you are removing is greater than Seats Left in the Group:For example: You choose to remove 6 seats and hence edit the Total Seats field and change it from 50 to 44. In this case, since the number of Seats you are removing (6) is greater than the Seats Left in the Group (5), a warning message will be displayed since you are trying to remove more seats than available for removal and the Total Seats will stay as 50 and the Seats Left as 5.All the changes made by the admin to Total Seats and in-turn the Seats Left fields on the Group Edit Page, will be reflected as is on the Groups Dashboard Page for the Group Leader as shown in the Screenshot below.
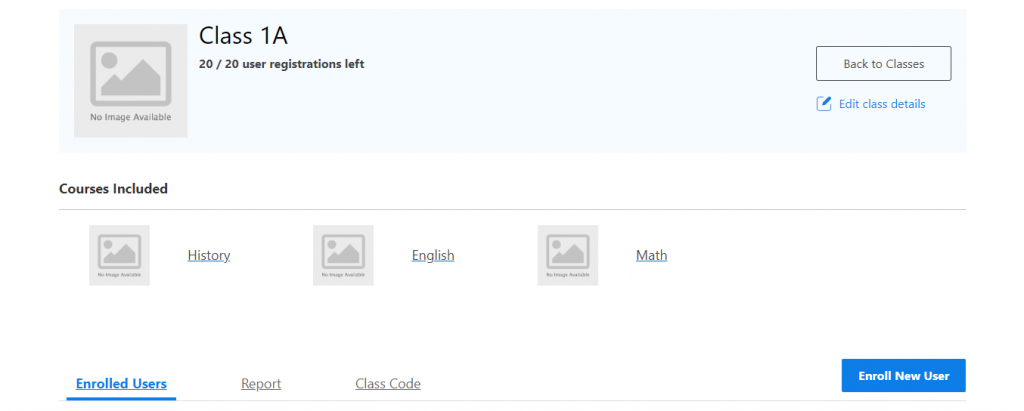 Screenshot for the Groups Dashboard
Features: Setting Up a Group Product
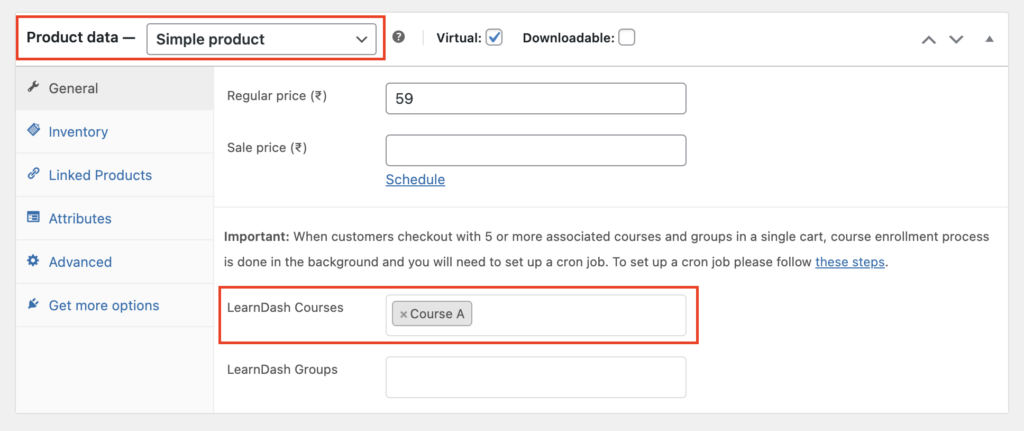
Create a new Woo product from the WooCommerce product creation screen. Add the Courses to the product using the LearnDash Courses option as shown in the above screenshot.
Note : Please don’t add anything in the Learndash Group option.
By default, the course product types quantity cannot be increased. So, to allow users to purchase multiple copies of a single course, set the product type asSimple Productand checkEnable Group Registrationoption
Features: Setup Group Management Page
Within our plugins context, youll find the Group Management Page discreetly labeled as theGroups Dashboard Page
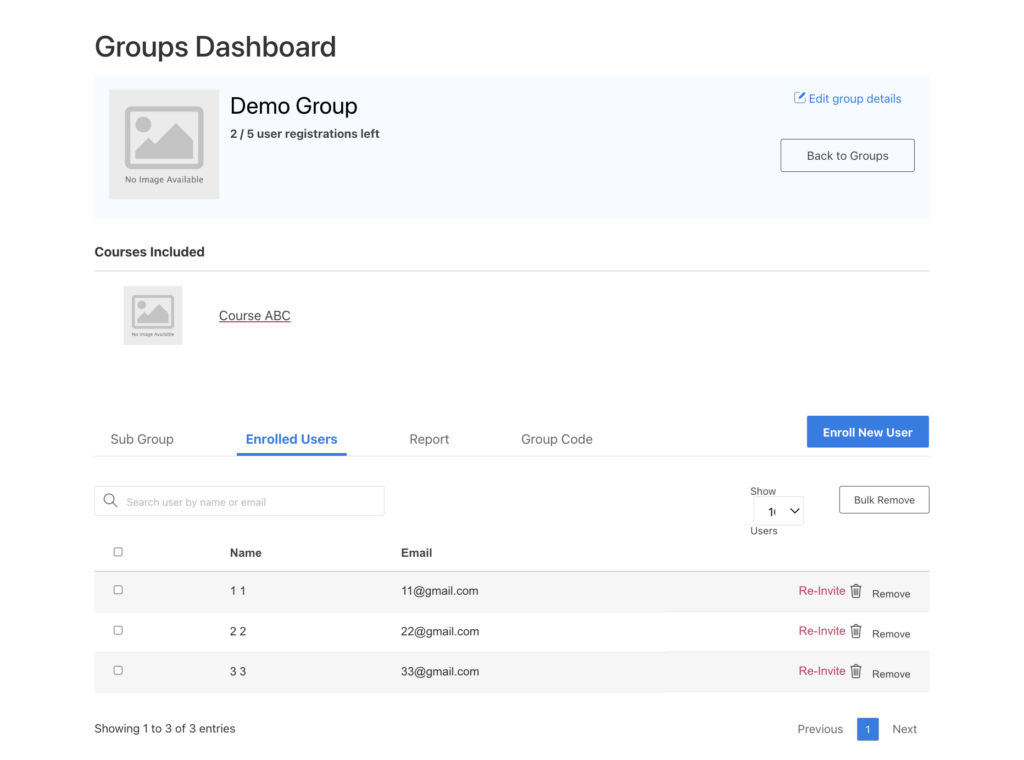
Once the plugin is activated, a new page is automatically created in your website with the titleGroup Dashboard. This is the main page responsible for handling all group management related activities after a group product is purchased.
You can add this page to your menu for easier accessibility or you can redirect group leaders to this page on login from theLearnDash LMS > Group Registration SettingsPage.
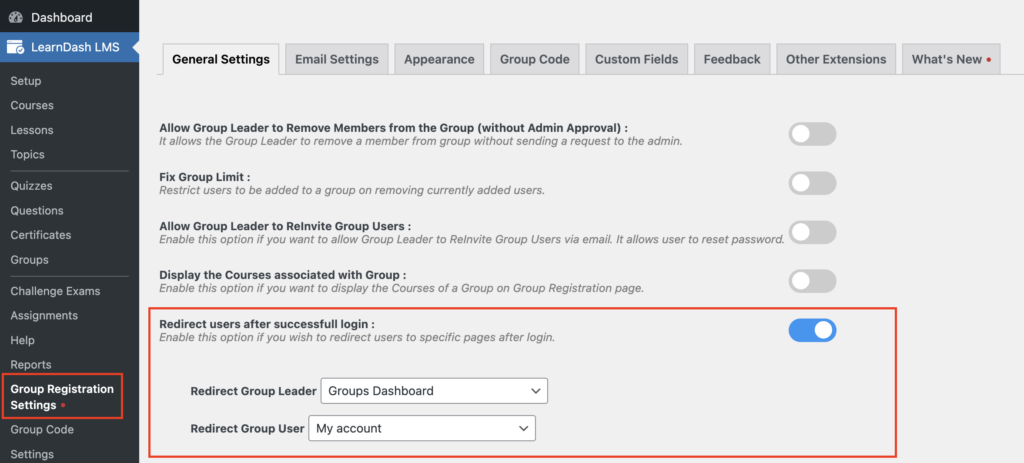
Features: SettingsThe admin can configure various group registration settings from the settings page atLearnDash LMSÔ××Group Registration Settings.
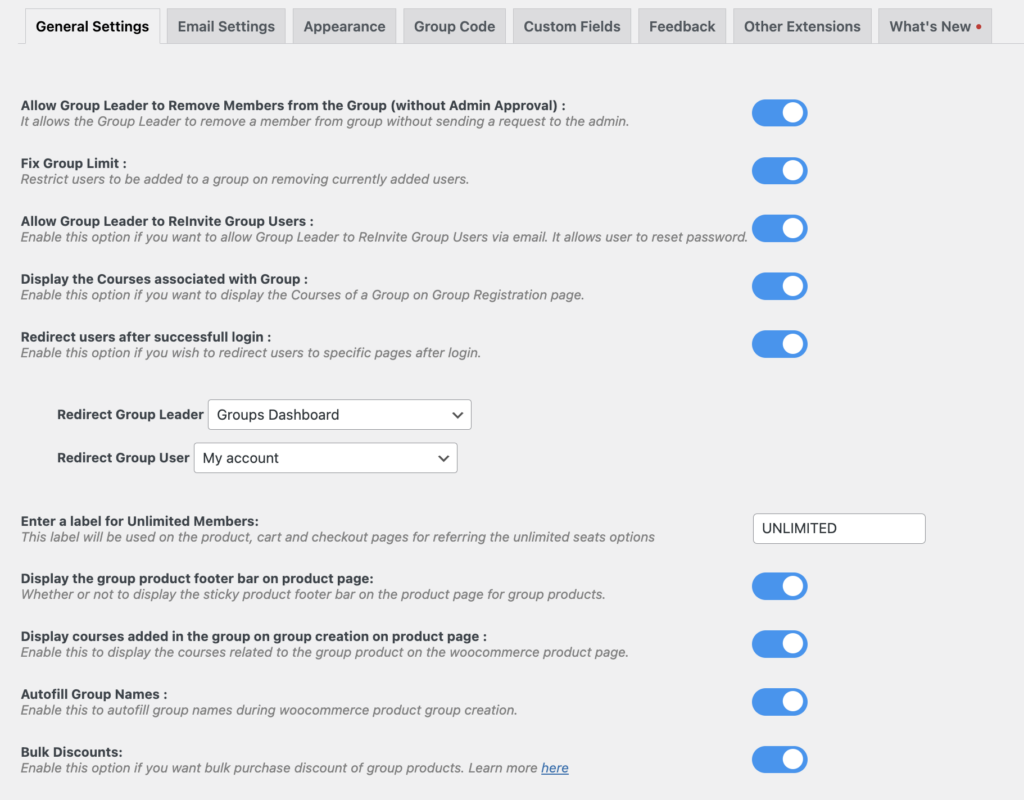 Allow Group Leader to Remove Members from the Group (without Admin Approval) :This option allows the Group Leader to remove a member from the group without sending a request to the admin.Fix Group Limit :This option restricts the group leaders from adding new users when single or multiple users are removed from a particular group.Allow Group Leader to ReInvite Group Users:This option will send an email to students to reset their passwordDisplay the Courses associated with Group :This option will display the courses associated in a group in the Group Registration page.Redirect users after successful login :This option will redirect users and group leader to the pages that admin selects from the dropdownEnter a label for Unlimited Members :This label will be displayed on the product, cart, and checkout pages to refer to the unlimited seats option.Display the group product footer bar on product page :This option will display the courses related to the group product on the WooCommerce product page.Autofill Group Names :This option willautofill group names during woocommerce product group creation.Bulk Discounts :Enable this option if you want bulk purchase discount of group products.Features: Email TemplatesGroup Registration Email TemplatesThe admin can customize the emails that are sent to admin, group leaders, & students by the plugin from the settings page atLearnDash LMSÔ××Group Registration Settingsunder theEmail Settings Tab.
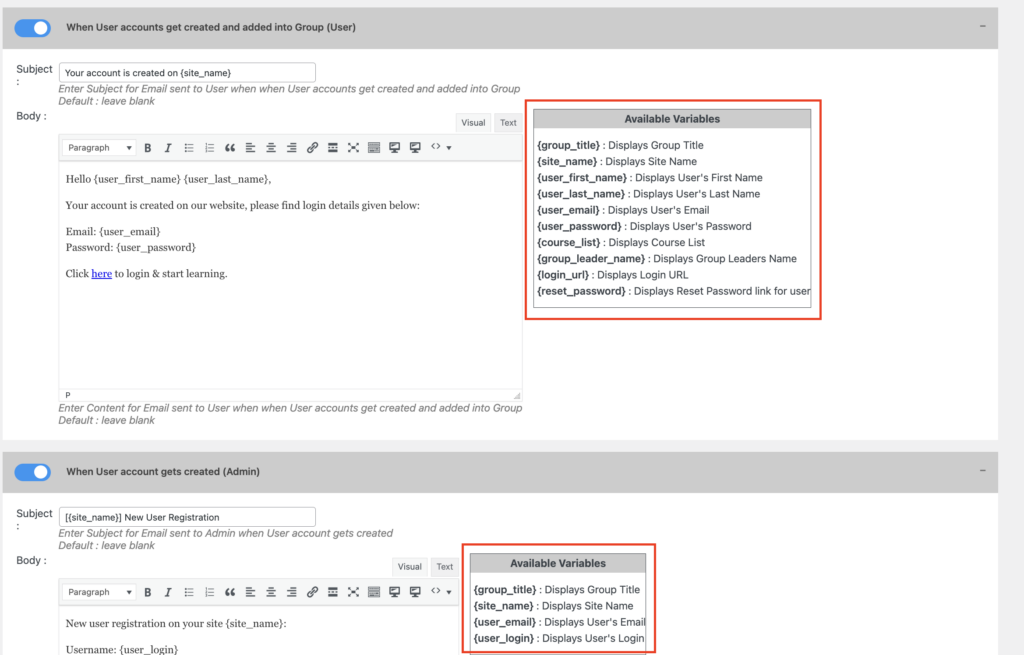 Additionally, you can use the different Available Variables which are mentioned on the RHS of the email block inside your email body.
Its important to note that these variables are specific to each email block and will only work within their respective email blocks.Features: Group Leader Default Access for Group Courses
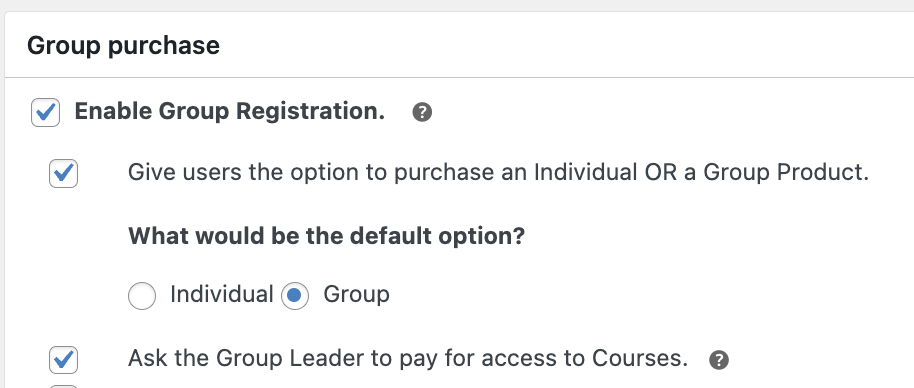 Configure group leader course accessBy default, the customer buying the grouped product has free access to all the courses related to that product. The Admin is now able to decide whether or not the Group Leader will be enrolled by default into the course, irrespective of the licenses purchased.If this option is checked, the Group Leader can choose to pay for his/her course or buy bulk licenses without enrolling himself/herself in the course. If you wish to disable group leader access and request payment for his/her access check theAsk Group Leader to pay for course accesssetting.
 Option on front-end to enroll group leaderThis would provide an option to allow the customer to enroll himself as a student in the group and charge for it.Features: Default License Purchase Types
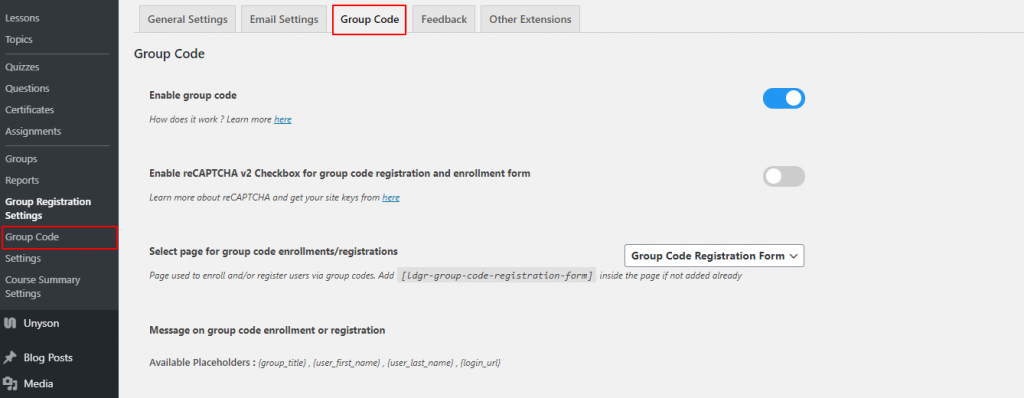
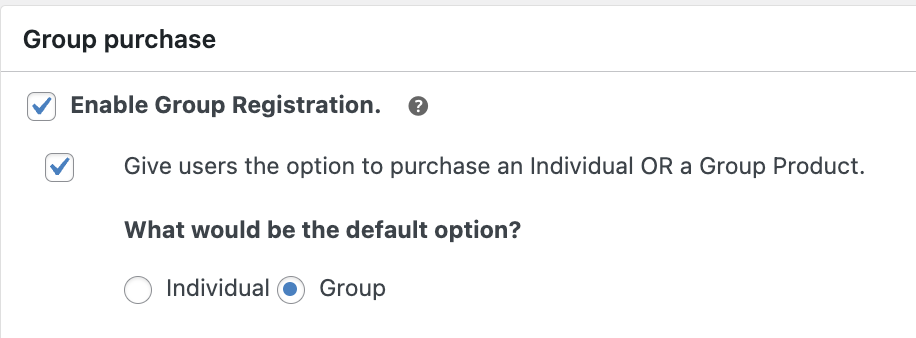 Configure default purchase optionThe Admin has the option to set the default License Purchase Type asIndividualorGroup.Individualpurchases are regular license purchases without any group registration options applied.Grouppurchases are the ones which would be treated as group purchases where all group registration features will be applied.Users can change it at the front end if required, but the default setting will be pre-selected when the options are displayed at the front end.Features: Creating Bulk Packages for Multiple PurchasesPost-integration with the WooCommerce plugin, each course and course variation can be sold as an independent entity. The Administrator has the option to set a fixed quantity for the number of course licenses that can be purchased.To do so, the following procedure is to be followed.On theEdit Productpage, set up the main course, along with its variations.Setting Up VariationsSet up theSizeattribute and add the relevant values corresponding to the number of packages in the bundle.Setting up additional attributesNow, in the Variations tab, choose the course variation which you want to sell as a bundle. Check theAvailable as a Packagebox.Features: Group CodesLearnDash Group Registration has a new group codes feature to allow quick and easy enrollments of students into groups without the hassle to create large CSV files for upload every time you wish to enroll new users in bulk.You must have theAnyone can Registersetting checked under General Settings to use Group Code feature.Enable Group Code FeatureGroup Code Settings ScreenshotGroup Codes can be enabled from the Group Registration Settings under theGroup Codetab as shown in the above screenshot.Once theEnable Group Codesetting is active, a new sub-menu is available under LearnDash LMS>Group CodeGroup Codes TabOn the Group Registration( Groups-Dashboard) page a new tab for Group Codes is added for creation and management of group codes.
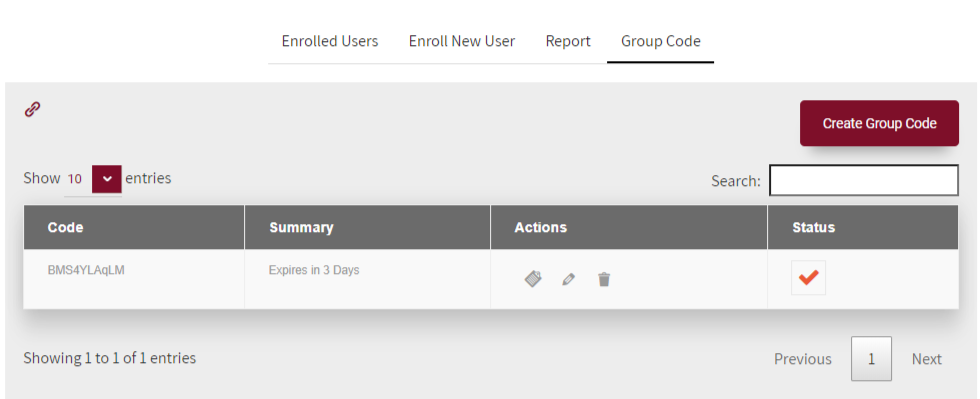
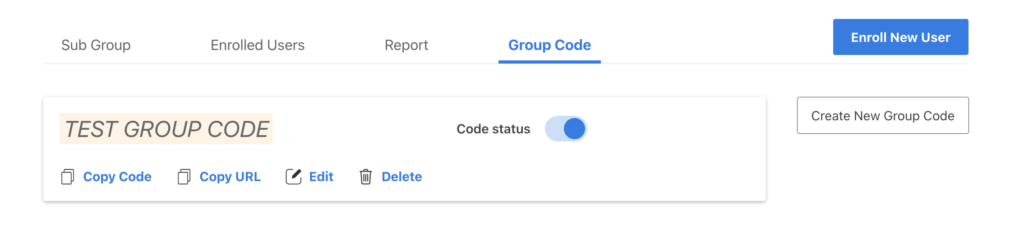 Group Codes Tab ScreenshotCreate Group CodeCreate new group codes for the selected group by clicking on theCreate Group Codebutton.
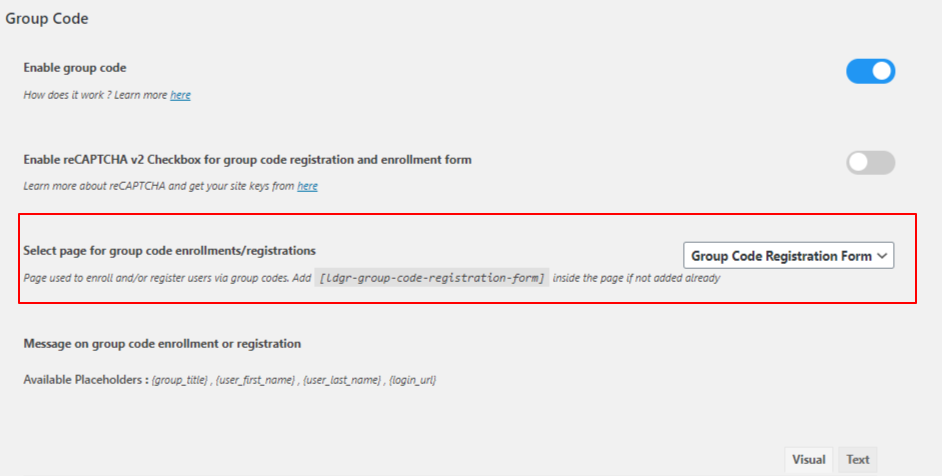
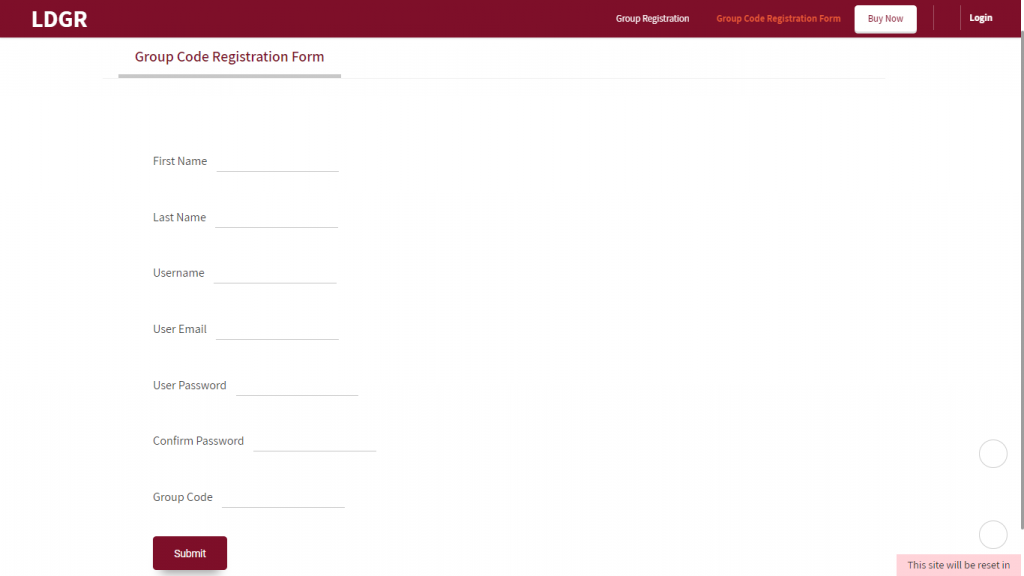
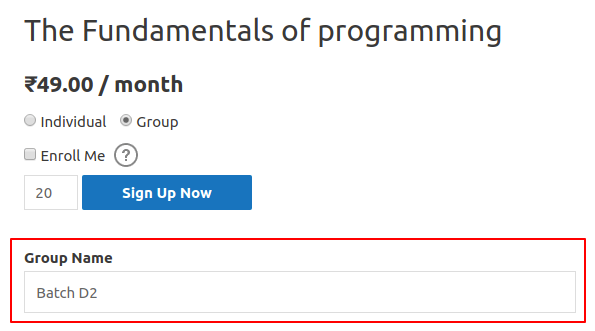
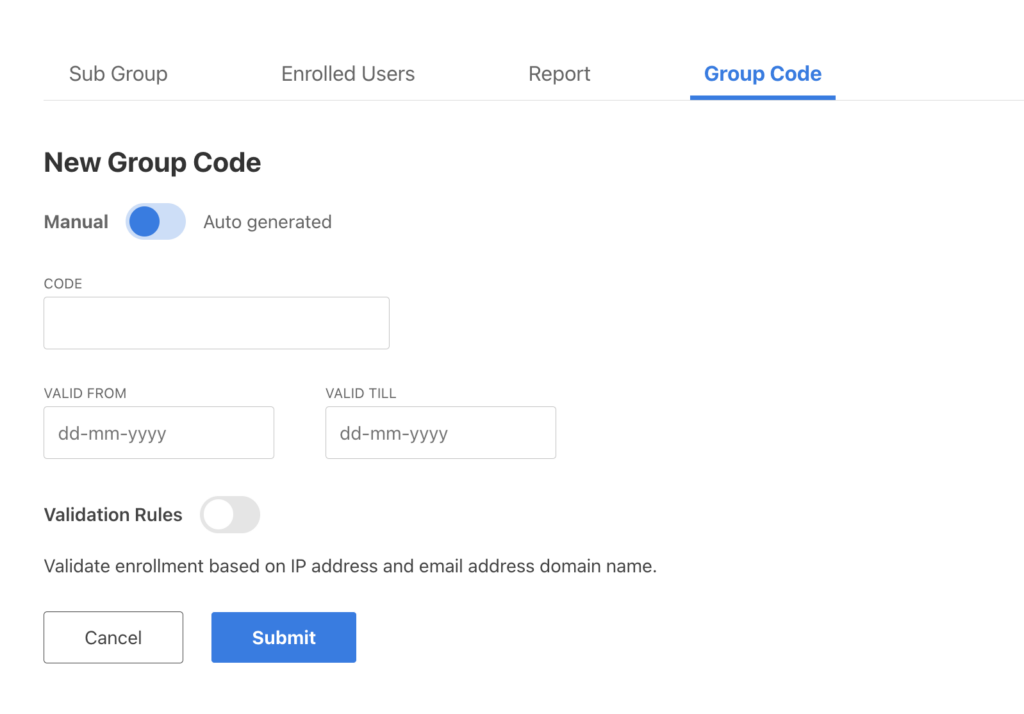 Create Group Code ScreenshotFollowing is a description of all the fields used to create a group code(A)CodeThe actual code which will be used by students to enroll into your group. It is unique and if you are not sure what code to use, you can simply click on theAutoGeneratedbutton to generate a random unique code for you.(B)From and To DateThese fields are used to define the valid date range during which this code can be used.(C)Validation RulesThese are special rules that can be enforced when the group code is used for enrollment. There are 2 types of validation rulesIP Validation :As the name states it validates the IP address of the enrolling student using the group code. This can be used if you wish for the group code to be used for registrations/enrollments only from a specific IP Address. ( eg: 10.10.10.10 )Domain name validation : You can validate the domain name of the email address used during enrollments using this option. A simple use case for this can be enrolling employees of a company which has a specific email domain for all their employees. ( eg: gmail.com)(D) Group CodeStatus( Active / Inactive)The default status for the group code ( Active or Inactive ). A group code can only be used if its status is active regardless of any other settings.View Group CodesView Group Code ScreenshotYou can view the list of all group codes for a group under the Group Codes tab as shown in the above table.From an overview you can see the code, when the code expires and how many users are enrolled using it, some actions and the status of the group code.There are 3 actions available under the actions columnCopy :You can copy the group code from here. Click to copy the group codeEdit :You can edit all the group code settings from here.Delete :You can delete an existing group code from here.The status field is a quick way to manage the status of the group code.Group Code Registration FormTo use the group codes created by the admin and different group leaders, you need to configure the group code enrollment / registration form.Group Code Form Settings ScreenshotUnder the Group Code Settings there is an option select the group code enrollments/registrations.Create a new page for the group code registration form and select it for the above setting.This would add the following shortcode at the end of the selected page content[ldgr-group-code-registration-form]Click on save to save the changes.New User RegistrationsOnce the group code registration form is configured and saved, you can register and enroll new users to your group using the group code from the configured page.Group Code Registration Form ScreenshotIf a user is logged out, it will display a simple user registration form to allow users to enroll using the group code shared with them.Existing User EnrollmentsGroup Code Enrollment Form ScreenshotFor logged in users, visiting the group code registration form will display a single field for entering the group code. Users can their respective group codes to enroll in their specific groups.Note :If you do not wish to display the complete registration form and instead only the group code field to enforce users to create their account some other way on your website and then use the group code form then you will need change the the shortcode to[ldgr-group-code-registration-form register=false]Google Recaptcha SettingsYou can enable and configure Google Recaptcha v2 for your group code enrollment and registration form from the Group Code Settings.Group Code Recaptcha Settings ScreenshotRegistration and Enrollment MessageGroup Code Enrollment Message Settings ScreenshotConfigure the message to be displayed on successful enrollment/registration of a user using the group code from the Group Code settings page.Make use of dynamic placeholders which can be used in the message content. Following is the list of available placeholders.{group_title}: Display the title of the group{user_first_name}: Display users first name{user_last_name}: Display users last name{login_url}: Display site login linkFeatures: Making Bulk PurchasesUpon activating the Group Registration plugin, a user has the option to purchase multiple courses during a single checkout.WooCommerceProduct Page with Group OptionsWhen theIndividualpurchase option is selected, the user is not given an option to change quantities of the product and this purchase will be made for a single user.When the user selectsGrouppurchase option, they are able to increase the quantity which is the total number of members that can be added to a group. With this option a group will be created for 1 as the quantity.Features: Managing Students and Reporting in Groups Dashboard PageStudents can be registered for the purchased course using theGroup Registrationpage. The plugin automatically creates aGroup Registrationpage, using which Group Leaders can add and manage students.Please note: If this page is not created, you can create a new page and add the shortcode[wdm_group_users]to create the Group Registration page ( Group Dashboard ) .The Group Leader has the option to view and manage students added to a group for a particular course by selecting the group name under theGroupselect option. On selecting a group, the list of enrolled students is displayed.
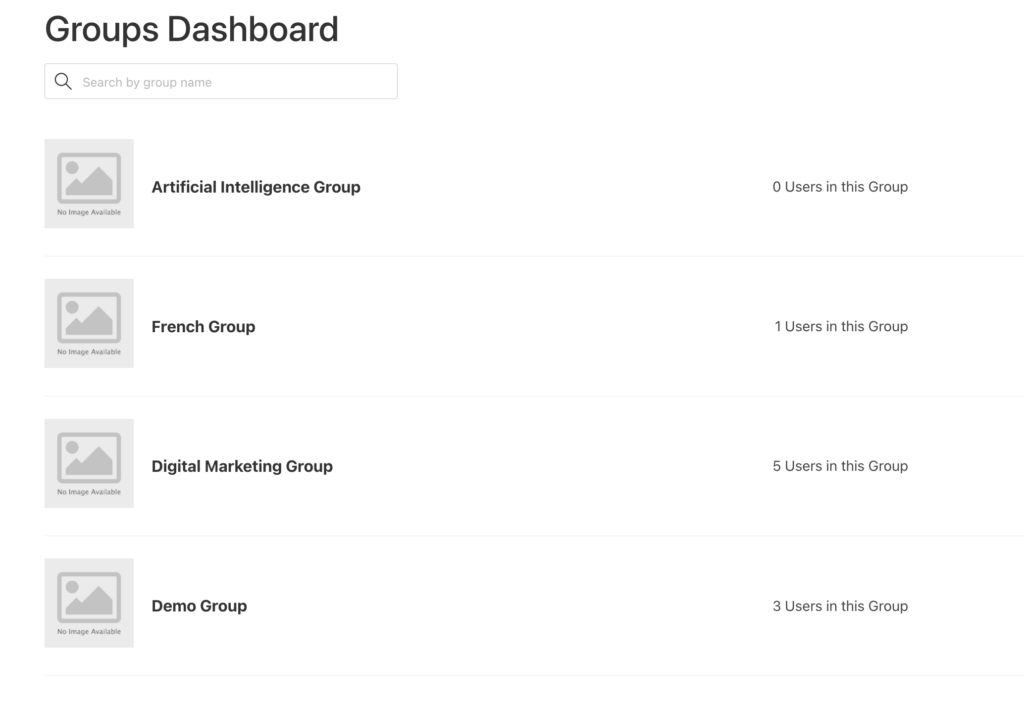 Enrolling Students
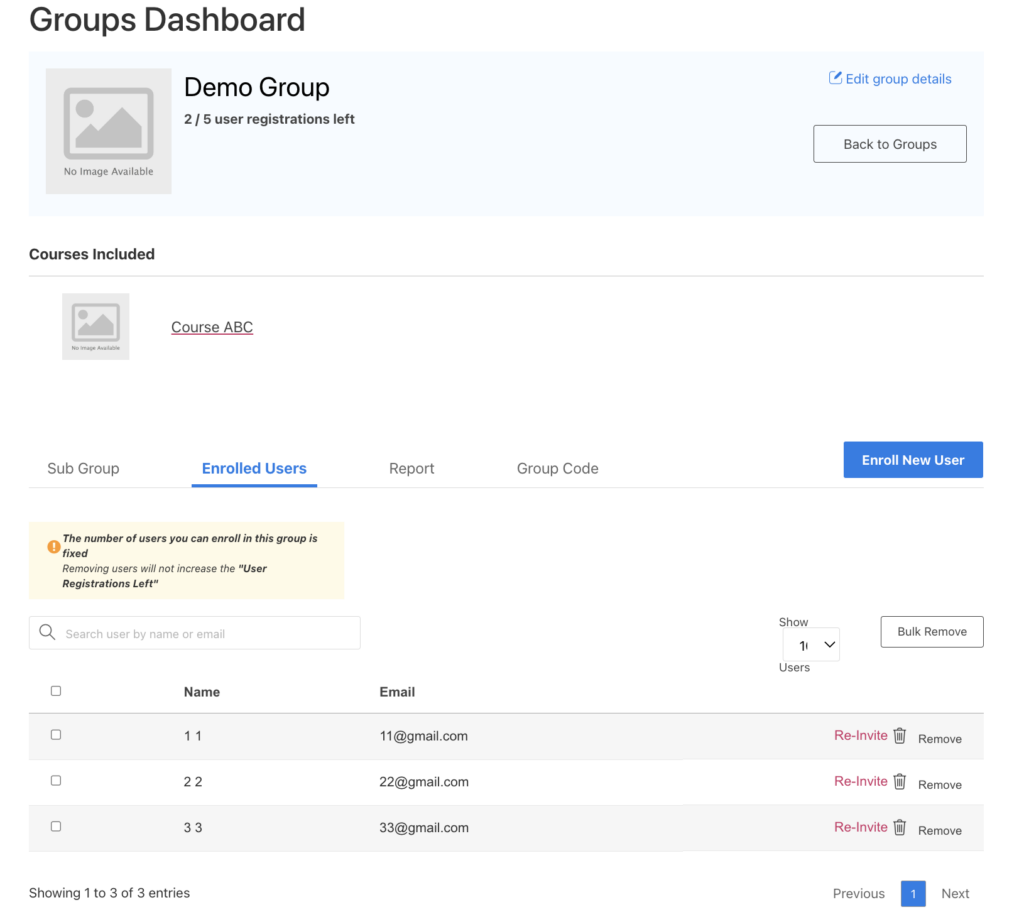 The Group Leader has to enter the students name and email id to enroll a student for a course. If a WordPress user does not exist for the student, a new user is created and the student is registered for the course. If the user already exists, he/she is automatically added to the group and enrolled in all the groups courses.Re-Inviting StudentsRe-invite group users settingIn case the newly enrolled user lose access to their account credentials or forget their password. InLearnDash LMSÔ××Group Registration Settingson enabling the optionAllow Group Leaders to Reinvite Group Users, the group leader can re-invite group user. Once the invitation is sent, the user will receive an email containing their group details, username and password reset link. The admin can also customize the invitation email template.
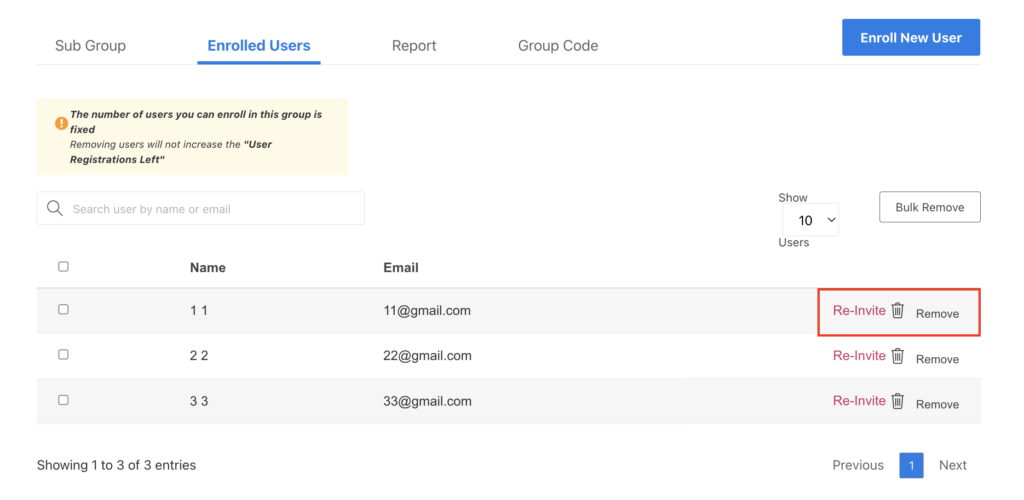 Re-inviteRemoving Students
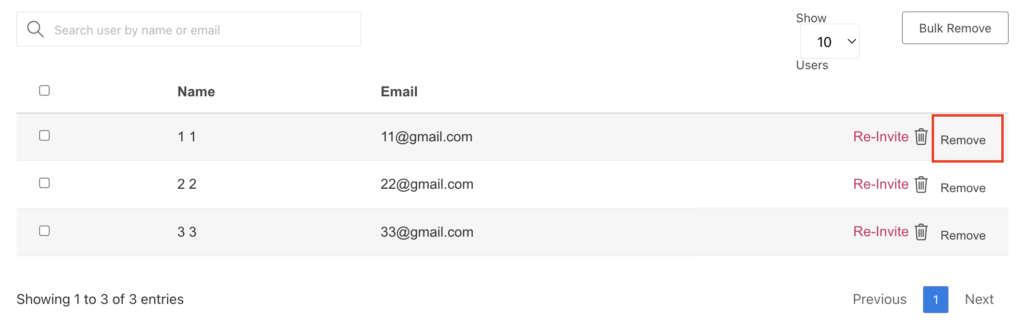 ARemoveaction is available in case the Group Leader wants to unregister a student. However, clicking on theRemoveaction only sends a remove request to the Admin, and does not remove the student directly.
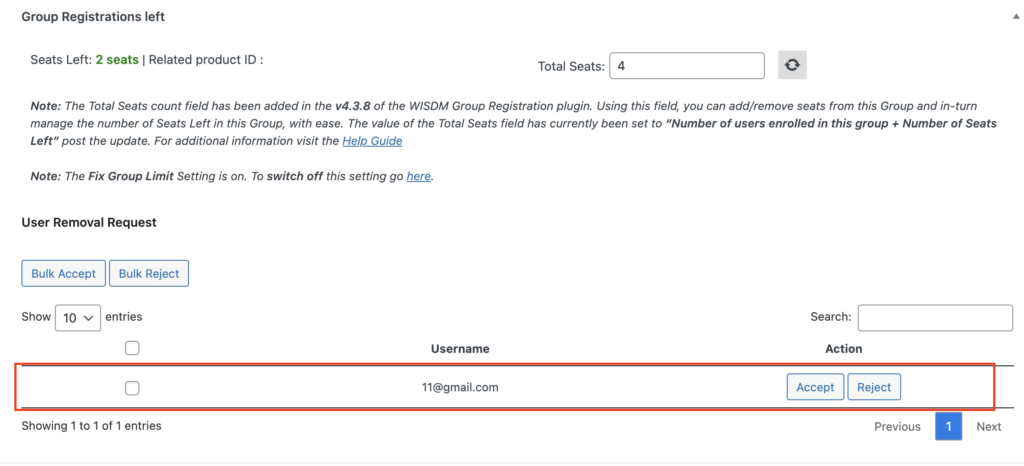 Under every groupLearnDash Ô×× LMS Groups Ô××GroupName, the Admin has the option to Accept or Reject Remove requests sent by the Group Leader.Reporting
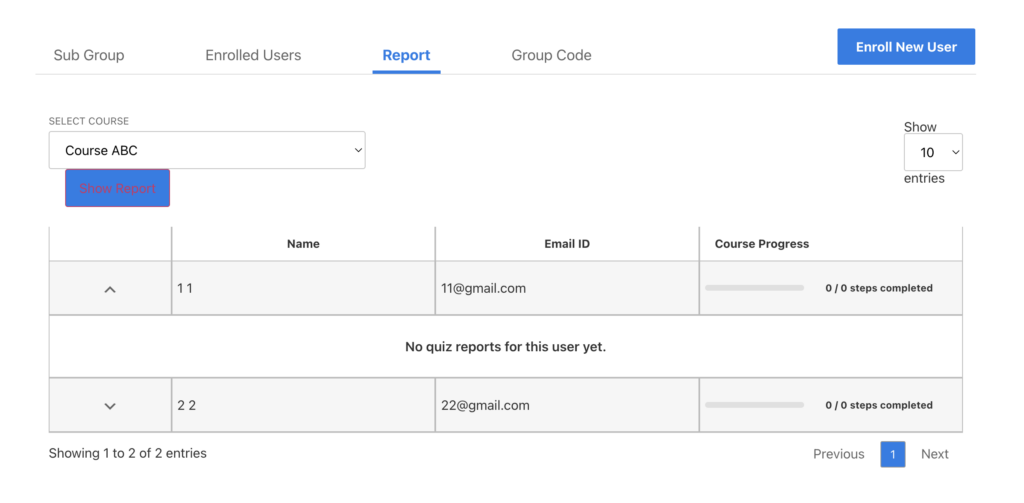 The Group Leader can access reports for a course that the Group Leader has purchased. From the drop down, the Group Leader can select a course and the reports for the users who have attempted the course will be displayed.The Group Leader can see the Course progress, Quiz Statistics and Certificates.Features: Performing Bulk ActionsBulk actions allow admins to make quick work of large scale additions or removals of information.Bulk Enrollments
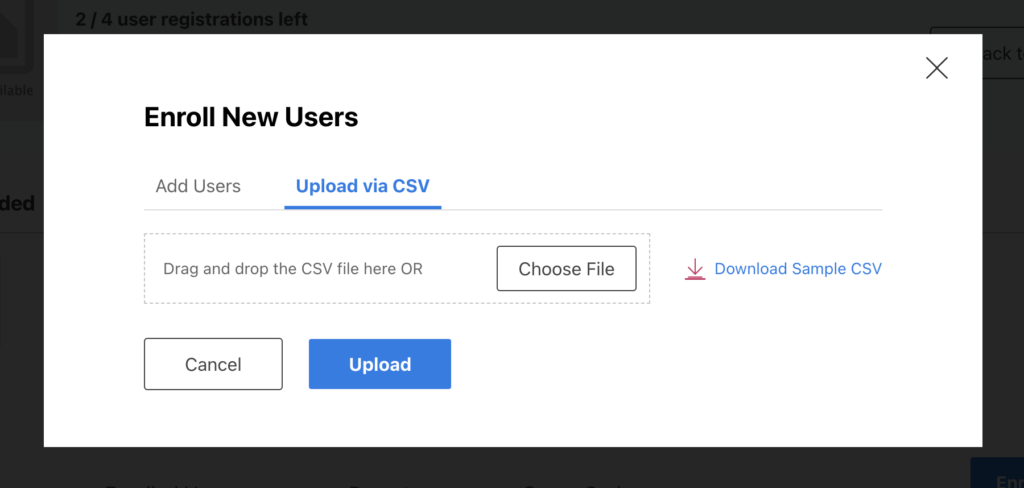 Bulk Upload Users Via CSVGroup Leaders can upload a CSV file to enroll members to the group. The format for the CSV file needs to be: First Name, Last Name, Email id.A sample CSV file can be downloaded from the group registration page.The users enrolled via this method will receive emails as per the email settings configured in the WISDM Group Registration plugin email settings section.If the number of seats remaining are lesser than the users in the CSV, then the group leader will get an error notice that the group limit has exceeded.Bulk Removal
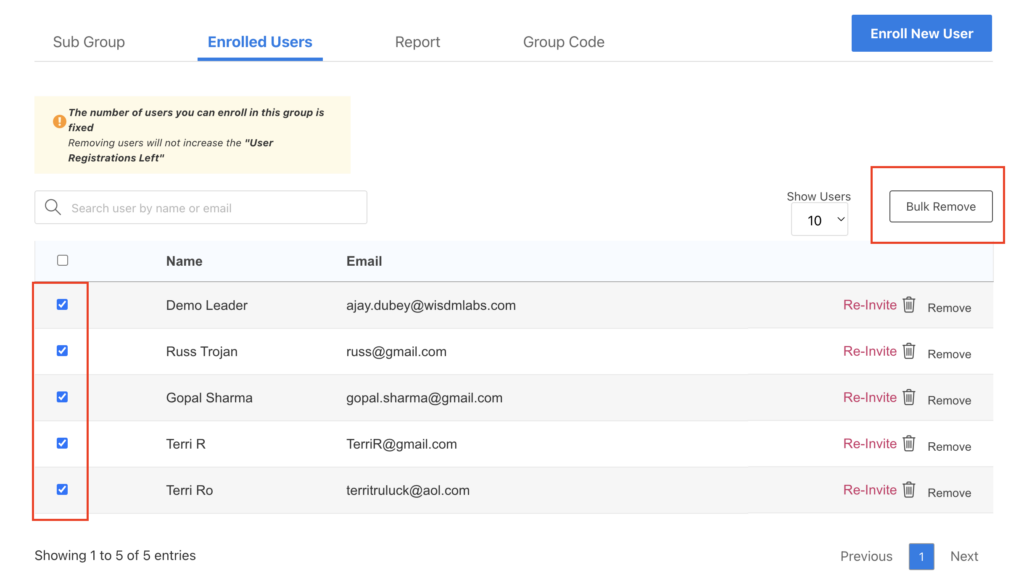 Bulk User RemovalThe Group Leader can also bulk remove multiple users from a particular group by checking the checkbox at the start of every user entry and clicking on theBulk RemoveButton.Features: Custom Group NameAdding a custom group names helps differentiate classes and products by giving them a unique designation.Assign Group NameAssign a name to your groupThe Group Leader can now assign a name to a group while purchasing from the group name text box on the product / download page.Update Group Name
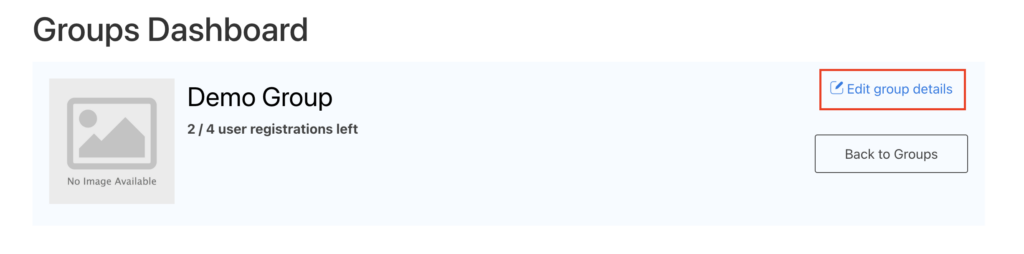 On theGroup Registrationpage, the Group Leader can change the group name by clicking on the Edit group details button.
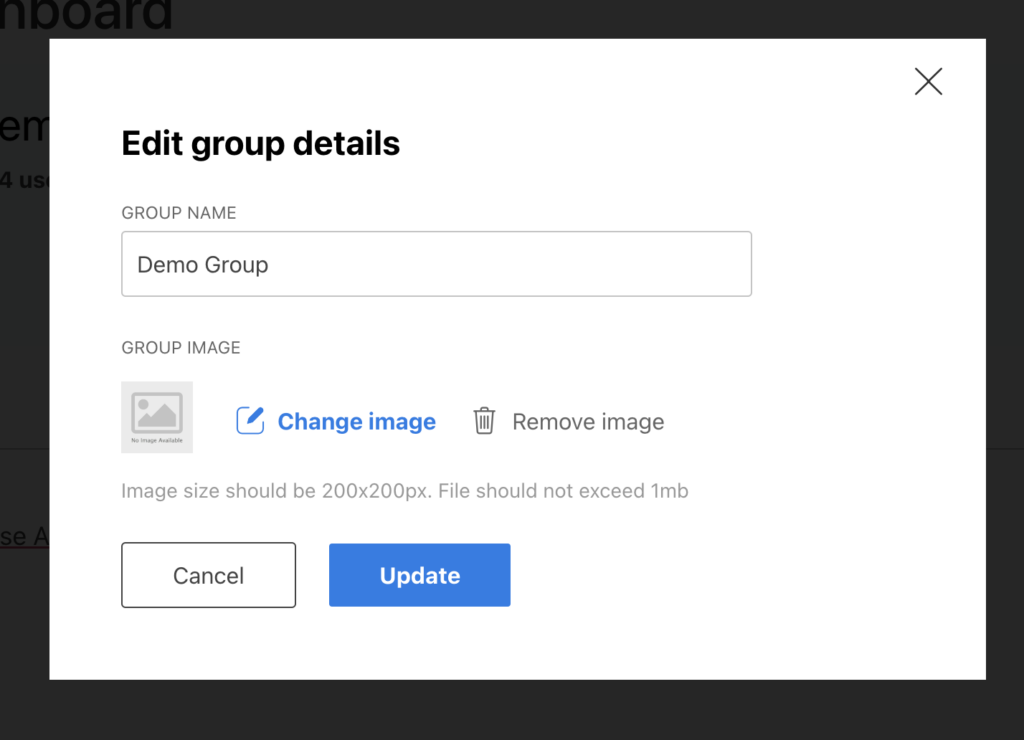 After a group name is set, whenever the group leader revisits the product or download page for that group, the set group name would be prefilled in the group name field.Please note that the group leader can only change the group name from theGroup Registrationpage.Features: Add/Remove group leadersLearnDash provides ability for an admin to add a new Group Leader to an existing group or to remove a Group Leader from a Group.Admin add/remove Group LeadersFeatures: Setting up Simple Subscription productsFor setting up aSimple Subscription, follow the same process as for aSimple Productand set the subscription period. Make sure theEnable Group Registrationoption is checked. Once the settings are done, the product can be purchased for a group just like a simple product purchase is made for group registration.Once the subscription period is over and if the subscription is not renewed, the groups will be moved to Draft and will remain as drafts, until renewed.Setting Up SubscriptionsOn the front end, the user can directly make a purchase by selecting the quantity for the group and the process remains the same.Product page for group subscriptionFeatures: Course List on Group Registration page
 Course info display settingInLearnDash LMS Ô×× Group Registration Settingson enabling the optionDisplay the Courses associated with the Groupwill display the Courses associated with Group on group registration page after selecting particular group.
 Features: Bulk DiscountsYou can configure your group registration products with global bulk discounts, product level or disable them altoghether.Global Discounts
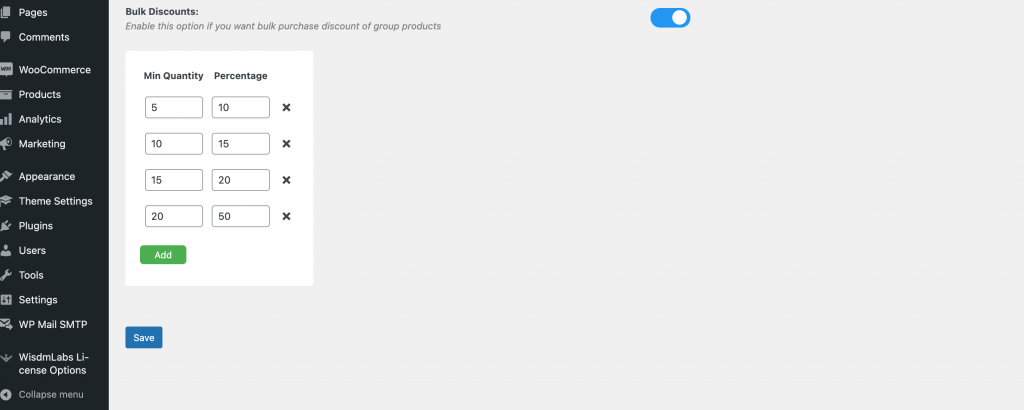 Global Bulk DiscountsVisit the Group Registration settings page from LearnDash LMS -> Group Registration Settings.On the general settings tab you will see the Bulk Discounts at the end, enable it.Global Bulk discounts allows the administrator to configure percentage discounts to be applied on all the group registration products.You can add 1 or more discount rules for the percentage discount to be applied against a minimum quantity of the product purchased.Note:You cannot have more than 1 rule with the same Minimum Quantity.Product Specific Discounts
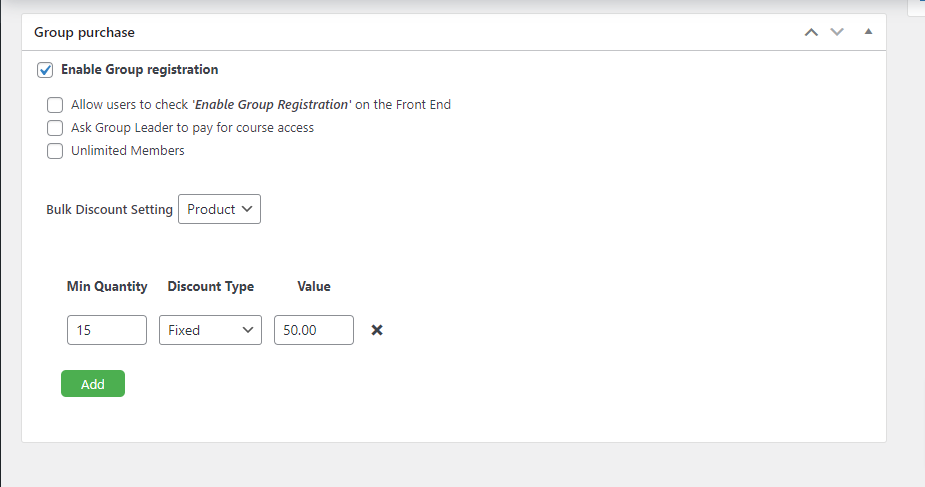 Product Specific DiscountsSimilar to global bulk discounts, you can configure discounts for specific products for which you may change the discount settings as compared to the rest of the products or disable them for that product.As per your need set theBulk Discount Settingwhile configuring the product. When configuring bulk discounts you have an additional option to configure bulk discounts either on percentage or a fixed amount.Features: Sub GroupsWith LearnDash now supporting group hierarchy you can make most of it now using our sub-groups management feature from the groups dashboard.First, enable sub-groups in the groups hierarchy setting from the LearnDash Group Settings page under Global Group Management and Display Settings.
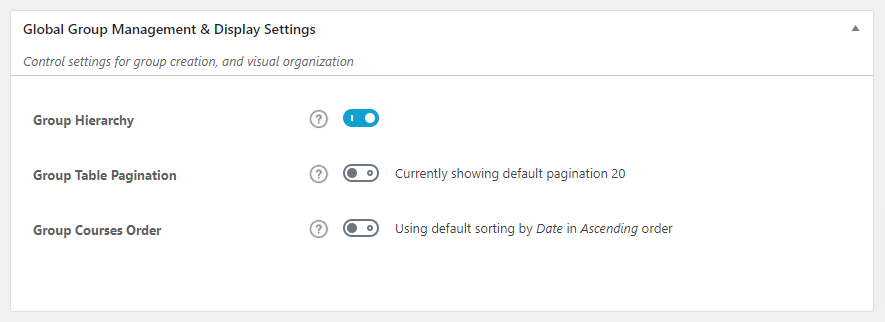 LearnDash Group Hierarchy settingsOnce you have enabled the setting, you can create and manage sub-groups from the groups dashboard.Create Sub GroupYou can create new sub-groups from the groups dashboard under the Sub-Group tab by clicking on the Create New Sub-Group button.
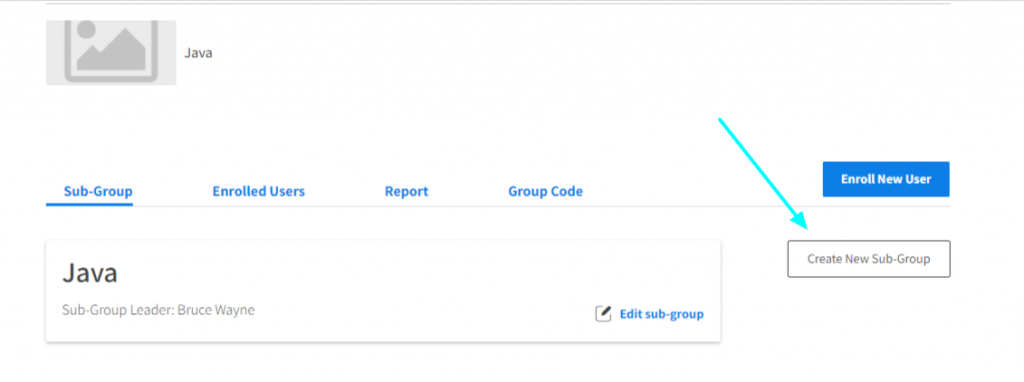 Sub-Groups tab on Groups DashboardThis will display the new sub-group creation form with the following fieldsSub Group Name: The name of the sub-groupNumber of Seats: The number of seats to be allocated to the sub-group. The seats for the sub-group being created will be taken from the parent group and deducted once the sub-group has been created.Sub Group Leader: Choose a sub-group leader from the list of users currently enrolled in the parent group. The selected user will become a group leader who will have access to the sub-group like any other group from the groups dashboard.Add Users: Users to be transferred from the parent group to the sub-group. Selected users will no longer be a member of the parent group and the course access will also be restricted to that of the sub-group.Courses: List of courses to be allocated to the sub-group. Users enrolled in the sub-group will have access to these courses.
 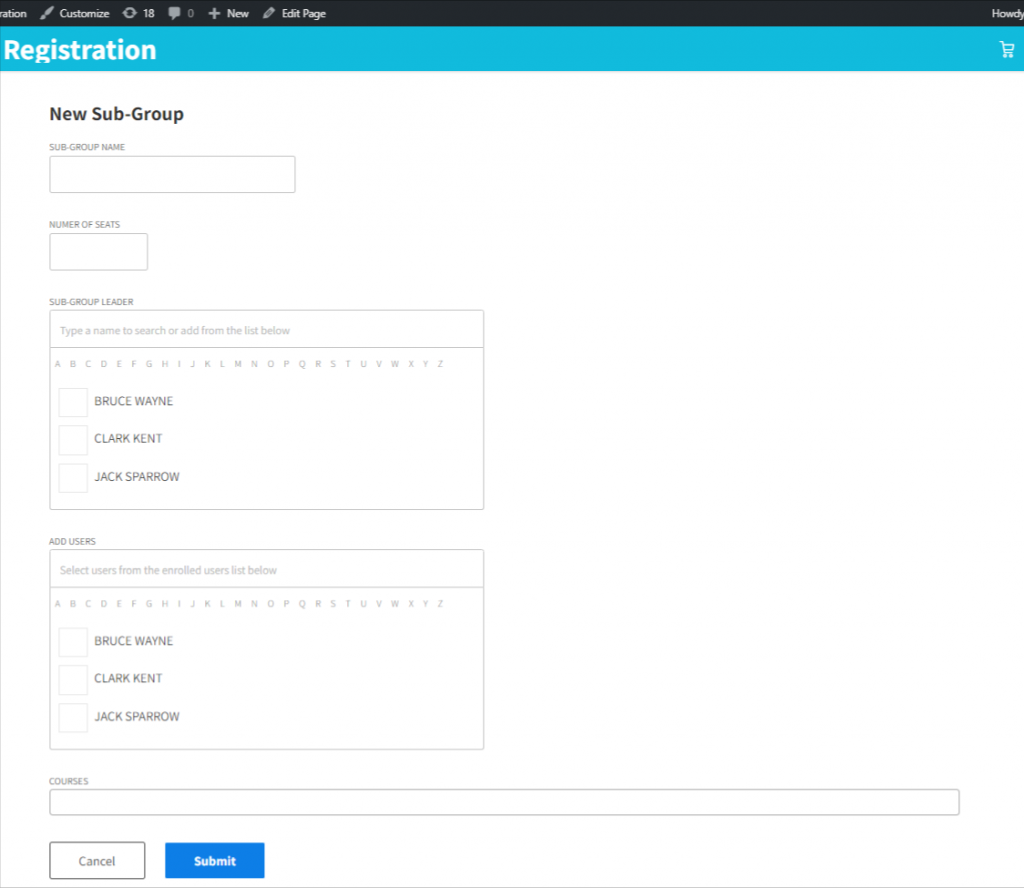 Sub-Group Creation Form Edit Sub GroupYou can also edit the details of a sub-group by clicking on the edit sub-group button.
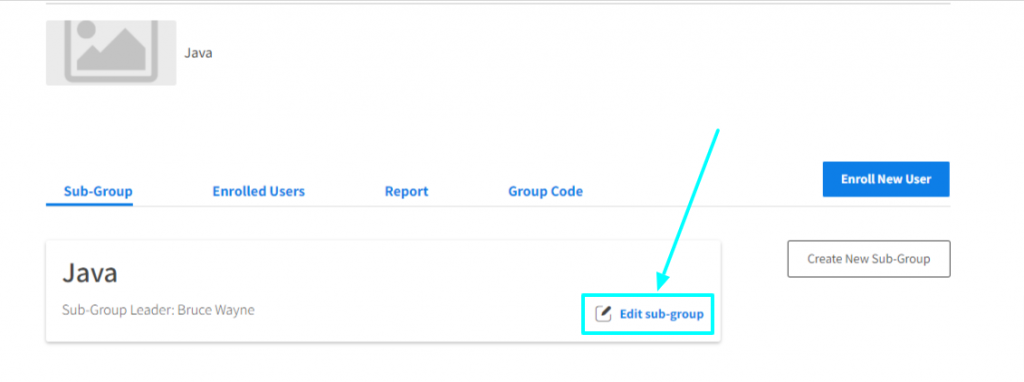 Fields provided while editing the sub-group are same as the ones provided during creation.Manage Sub GroupThe admin and/or group leader can view the list of groups and sub-groups from the groups dashboard.
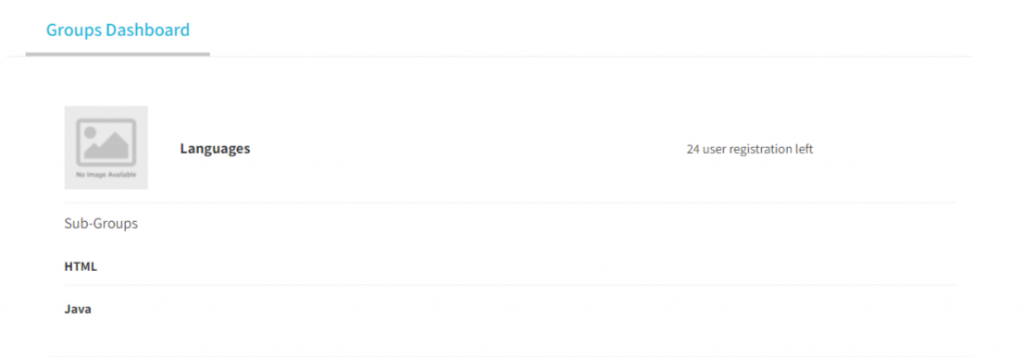 Groups Dashboard ListYou can access the group/sub-group by clicking on the name of the respective group/sub-group.One can always know the parent group of a sub-group from the groups dashboard as shown in the section below.
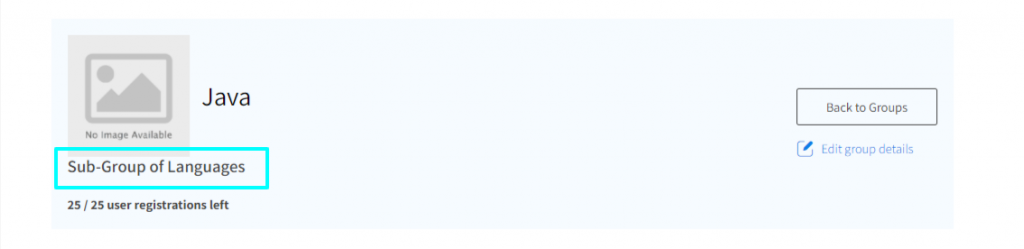 Parent Group details on sub-groupManaging a sub-group is similar to managing any normal group just with the difference that there will not be any sub-groups tab.Which means that we cannot create sub-groups from sub-groups.Features: Additional Group OptionsAs of LearnDash Group Registration v4.3.0, the following features are available to your Group Leaders:Create/purchase multiple groups of the same woocommerce group product.Increase seats of existing groups.Add courses to existing groups.This update will also enable the admin to:Allow Group Leaders/users who purchase the Group Product to add additional courses to the purchase.Set the prices of the additional courses sold according to their need.With the older versions of the Group Reg. plugin (v4.2.3), Group Leaders could only add additional seats/members to their existing group on purchasing the same Group Product that they purchased initially.With this version (v4.3.0), there is more flexibility offered to your Group Leaders for a smooth Group Management experience, where the Group Leaders who already have a group can add more seats/members to their Group, create a new Group (if needed) while purchasing the same Group Product and will also be able to add new courses to an existing/new group (if needed).Sell more Courses with Improved Pricing ControlNo need to worry about how the additional courses (other than the ones already in the Group Product) are priced. This update also gives the admin flexible options in order to sell additional courses at the kind of prices that will suit them best. Heres how the pricing options work:The admin can sell additional courses to purchase with a Group Product (the courses will be added to the group) at anfixed cost that will be added to the total Cart Value,multiple of the price entered for courses(for unlimited member) or atthe course price * number of seats for limited membersFixed CostThe buyer/user can add additional courses with a fixed price for each additional course.Multiple of PriceThe buyer/user can add additional courses with the multiple of price of additional course.For example, if the additional course that was added is priced at $100 and multiple is set to 5 then that additional course will cost $500 and this price will be added to the total cart amount to be paid.Setting up a Group Product with Additional Group OptionsCreate a WooCommerce product.Set up the Group Product like you usually do with the plugin ÔÇôsetting up group a productEnable theAdditional OptionsSetting.Enable additional options for groupsOnce theAdditional Options for Groupsis active, a new sub menu will be available for additional settings related to group options.Additional Courses for Group PurchaseHere you can add a list of courses that will be available to purchase by the buyer/Group Leader (these courses are separate from the ones already in the Group Product)Unlimited Price TypeYou have 2 options for unlimited seats price type for additional courses. Multiple and fixed(Added description above)Price type valueValue for unlimited price typeConfiguring additional options for groupsBuying products/groups with Additional Group OptionsOn the product page, if the incoming Group Leaders/buyers do not have any group purchased before they will be given an option to purchase an Individual or a Group Product, this is the default flow of the plugin.In case the Group Leaders have previously purchased 1 or more groups using the same group product, the Group Leaders will see a drop-down menu with additional options for purchase:Additional Group options on product pageIn case the users select thecreate new groupoption from the drop-down, the checkout flow will be the same, i.e., a new group will be created on completing the purchase.In case the users select theincrease seatsoption from the drop-down, they will be allowed to increase the number of seats in their existing group. The price will be calculated based on the price of each seat when the group was purchased * number of seats.Price of each seat is ÔÇô base group price + total of additional courses amountIn case the users select theAdd Coursesoption from the drop-down, they will be able to add additional courses (as set by the admin) to their existing group.Features: Custom FieldsIt gets limiting when registration forms cannot give you the ability to create custom fields. Imagine catering to businesses (for eg., youre a training provider with companies as customers) and youre unable to capture the name of the company, contact info, address, designation, etc. of the employees registering in Groups. Frustrating right?Well Group Reg. for LearnDash solves this problem for you. Collect additional information for the users in your LearnDash Groups right at the time of Registration by adding your own Custom Fields to Registration forms available in the Group Reg. for LearnDash.The plugin has the Group Code Enrollment form (shortcode) and the Enroll New User Form on the Groups Dashboard to register users for a LearnDash Groups. With the v4.3.4 release of the plugin, you can add Custom Fields to both the above-mentioned formsVia these Custom Fields you can store additional information in a users meta data and can use it in other places of your site.Understanding custom fieldInformation can be collected in many different ways. For eg., if you need to the size of the company a user is registering from, you will typically need to have radio buttons that are labelled 50-100, 100-150, 150+ and so on. Whereas if you need the user to enter their address, you would simply need a text field.Group Reg. has different types of custom fields that you can add to the registration forms.Supported field typesNumbersText / Textarea dataCheckbox dataScreenshotsSettings page
 Group Code Reg. formThe Custom Fields that you add, will be shown to the user enrolling in the Group on the Group Code Reg. form (via shortcode) as seen below:
 Enroll new user formThe Group Leader will also be able to see the Custom Fields added by you on the Enroll New User form on the Groups Dashboard as shown below:
 You can also add custom fields while registering users through the Upload via CSV option. An example of one such file can be found below:dynamic_fields_demo.csvUpload via CSVLets take an example of one such CSV import and have a look at the image below:CSV input for Text type Custom Field:We have added Company Name as a new text field which has company_name as a meta name and marked this as a required field. So, the CSV file will look something like this. First Name,Last Name,Email,Company NameRuss,Trojan,[email protected],Infosys Alphonso,Cantor,[email protected],TCS Gopal,Sharma,[email protected],PersistantSimilarly, you can add multiple fields to the CSV file as per the sequence of the configuration page.CSV input for Checkbox type Custom FieldÔÇô if you enter on for a user in the CSV, the checkbox will denote the field is checked and ablankfield will denote the checkbox as off.CSV input for Number type Custom Field ÔÇôcurrently we support whole numbers for this field.Required field inputYou can also configure if the Custom Field will be a required field or not via the Required Switch as shown below
 Required fields are form fields that must be filled out with valid data in order for the user to registerFreeze first input featureOnce switched on, this custom field will not be replaced if re-entered via any of the registration forms.So lets say you provide courses for Schools and different schools register in Groups to take courses on your site. Lets assume you created a School Name Custom Field to be added to your Registration forms (via the plugin) to collect this information from your Group Enrollees.Now, what happens when a Group Leader (either by mistake or due to some reason) removes the user from the Group and needs to re-enroll them to the Group? Or the user is registering in another group via a Group Code on the Group Code Registration form? Do you want them to re-enter the School Name? Or do you wish for this value to be frozen (made non-editable) at the time this value was filled out for the first time?You can do both using the Freeze First Input Setting which is turned off by default. The off state means that the Custom Field is currently editable and will be updated for a user whenever the value for the custom field is re-entered (for that user) from any of the Registration Forms. The On state will freeze the input of the Custom Field for that user at the value that was entered the first time the user was being registered. Screenshot shown below:
 Features: Add to cart Parameter SupportThe ?add-to-cartURL feature in WooCommerce allows customers to add a product to their cart using a URL. This feature is particularly useful when redirecting customers from a blog post or third-party site directly to the checkout page with a specific product already added to their cart. Additionally, custom data such as a product note can be appended to the URL.The?add-to-cartURL feature supports several variables that can be used to customize the behavior of the Add-to-Cart. For example, the quantity of a product to be added to the cart can be specified by appending &quantity=3 to the URL. Customers can also be redirected to a specific page after adding a product to their cart by changing the base URL. For instance, customers can be redirected to the cart page by usinghttps://yourdomain.com/cart/?add-to-cart=25or to the checkout page by usinghttps://yourdomain.com/checkout/?add-to-cart=25.This feature also supports addingvariable productsto the cart. To add a variable product to the cart using a URL, you need to specify both the product ID and the variation ID. The product ID should be specified using the add-to-cart parameter, while the variation ID should be specified using the variation_id parameter with the other attribute data as parameter saved in the variation. You can also specify the quantity of a variable product to be added to the cart by appending &quantity=3 to the URL.This feature provides flexibility and convenience for both store owners and customers, making it easier for customers to add products to their cart and proceed to checkout.To find theproduct IDandvariation IDfor a variable product in WooCommerce, you can follow these steps:Log in to your WordPress admin dashboard and navigate to the Products page.Find the variable product for which you want to find the product ID and variation ID. The product ID is displayed in the ID column of the Products table.Click on the product name to edit the product.Scroll down to the Product data section and click on the Variations tab.Expand one of the variations by clicking on the small triangle icon next to its name. The variation ID is displayed at the top of the expanded variation panel.LDGR Extended FunctionalityWe are pleased to announce that we are expanding the functionality of our Woocommerce URL by introducing support for LDGR parameters. With these new parameters, users will have access to enhanced features that will make managing groups and adding seats a breeze.To facilitate these new features, we have added two new parameters to the URL:ldgr_group_name: This parameter allows users to create new groups easily. By specifying a unique name for the group, users can quickly and easily create new groups for their products or services.ldgr_group_id: This parameter enables users to add more seats to an existing group. By specifying the group ID, users can easily add new seats to the group without having to create a new one.These new parameters are designed to make it easier than ever for users to manage their groups and seats. We are confident that these enhancements will improve the user experience and make our Woocommerce URL even more powerful and versatile.Details about these new parametersldgr_group_name :Using this parameter if the product is an LDGR product this will add a new group product to the cart in correspondence to the value for group name provided inldgr_group_nameparameter.Eg :http://example.com/cart/?add-to-cart=18&ldgr_group_name=Group ProductIn the above example it will add a new product with a group name as Group ProductWe also have a setting in LDGR to auto fill the group name if this setting is enabled and if we do not pass group name and the relevant product is get to default as a group product it will default to autofill group name.ldgr_group_id :The LDGR plugin introduces a new parameter,ldgr_group_id, which is used toadd more seatsto a specific group. To use this functionality, you need to provide two required fields: theproduct IDof the group it belongs to and thegroup post IDfor which you want to add new seats.For example, the following URL will add new seats to the LDGR group with ID 36, which belongs to the product with ID 18:http://example.com/cart/?add-to-cart=18&ldgr_group_id=36To find the product ID for a specific group, follow these steps:Log into WordPress as an admin.Go to admin dashboardGo to the the LeardDash groups section.Select a group created with LDGR.You will be able to see the Related products retails just near the seats left section.See the below screenshot.
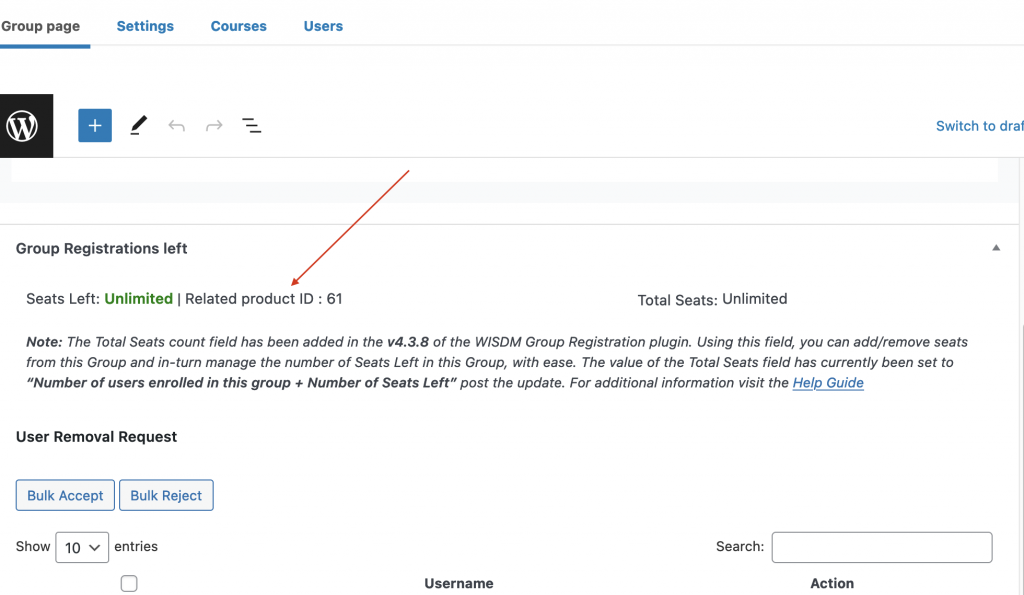 The related product ID for that product is the one you need to use with the ldgr_group_id parameter to add more seats to the group.Finding Product ID and Group ID visa versa using databaseIf you are an intermediate user who knows how to deal with databases, you can also retrieve the related products from the database below in two ways.Using Group post IDIf you have group ID you can find related order ID inside thewp_postmetatable the key to find related order id will precede with wdm_group_reg_order_id_followed by the group ID eg:wdm_group_reg_order_id_36see the below screenshot we can see 35 is the Order IDUsing Product IDWe store related groups from products in thewp_usermetatable lets see belowWe haveldgr_group_product_as a prefix followed by theproduct ID. in our case 18We can see that for product18it is related to group36including some other groups as well in the above screenshotBelow are somequick examplesof adding group products using URLIndividual product create group :http://example.com/cart/?add-to-cart=18&ldgr_group_name=TestGroupIn above example it will add a group product for product ( 18 ) if LDGR is enabled for this product and the name of the group will be set as TestGroupIndividual product Add seats :http://example.com/cart/?add-to-cart=18&ldgr_group_id=22In the above example it will add seats to the group22that belongs to product18Group Product :You have the capability to autofill the group name if the product is set to default as a group product.http://example.com/cart/?add-to-cart=18In the above example it will add a group product with a group named withich will be auto filled the usual convention would be{product name}|{todays date}Tips and Tricks: Special Characters in CSV UploadsWhile using the user CSV Upload feature, you may across certain situations where the uploaded users either have some weird ´┐¢ characters in either the user first/last name or the name has been set to their email address.This is the case when we are dealing with special characters like├ƒin your CSV file. If your CSV file includes special characters then your file must be encoded inUTF-8format.Although the sample download file the plugin provides in already encoded in UTF-8 format, your excel application might save them in different format.This article explains how to save your CSV file in UTF-8 format to avoid the above issue when uploading users through CSV file uploads.Saving in Microsoft ExcelIf you are using Microsoft Excel to create/view your CSV files follow the below steps.Navigate toFileand click onSave AsBrowse the location to save the fileEnter the name of the file and selectCSV(Comma delimited) (*.csv)in theSave As TypedropdownClick on theToolsoption and select Web-Options to open the Web-Options window.
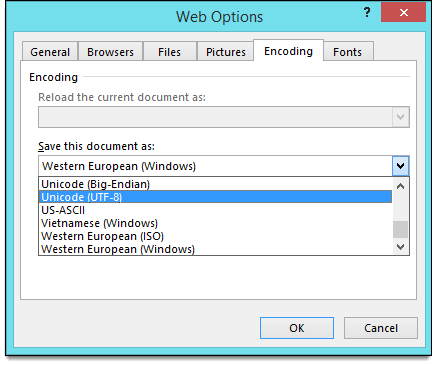 Now navigate to theEncodingtab and selectUnicode(UTF-8)in theSave this document asoption and click OK to save it.Saving in NotepadYou can also make use of Notepad to save the CSV in UTF-8 format.Open your CSV file in notepad.
 CSV in ANSI in notepadOn the bottom right you will be able to see the encoding type. In the attached screenshot, you can see it asANSIClick onFileandSave AsEnter your file name with the.csvand extension and selectAll Filesin theSave as typedropdown as shown below.
 Notepad change encoding to UTF-8Click onSaveto save the fileNow if you open the file again in notepad you will see the encoding changed to UTF-8 in the bottom right corner.
 CSV in UTF-8 in notepadIn case you are using any other Excel applications other than the above two you can check the application documentation on how to apply UTF-8 encoding.Video TutorialsCreating a Group Producthttps://www.youtube.com/embed/BDz11z9uY2E?feature=oembedConfiguring Group Registration Settingshttps://www.youtube.com/embed/ILuN9AUOjAI?feature=oembedUsing Group Codes to Enroll New Users into LearnDash Groupshttps://www.youtube.com/embed/VjKXoejIdLo?feature=oembedEnable Bulk Discounts with Group Reg. for LearnDashhttps://www.youtube.com/embed/AGAeL5pK7JM?feature=oembedManage Groups with the Group Reg. Groups Dashboard Pagehttps://www.youtube.com/embed/fevfW_5_cgw?feature=oembedAllow Group Leaders to Seamlessly Manage Groups by Creating Sub-Groupshttps://www.youtube.com/embed/U_nN-TX8hnI?feature=oembedDeveloper Docs: Hooks Changelog4.3.12Released May 10, 2023FeaturesAdded Feature to upgrade limited groups to unlimited groups.Added filter for autofill group name.Add to cart parameter support for woocommerce add to cart URL.FixesFixed issue with incorrect “Add more seats” responsive button.Fixed issue with group code visibility for admins and group leaders.Fixed UI issues related to LDGR group name during checkout page.TweaksAdded Related product ID of an LDGR group on the admin group edit page.4.3.11Released Jan 24, 2023FeaturesAdded an auto-fill setting for the group name.FixesFixed inconsistencies in the group name field.Fixed user transfer from main group to subgroup.Fixed issues related to enroll new user modal CSS.TweaksTweaked default activation status of newly created group code which is now set to active.4.3.10Released Dec 20, 2022FeaturesAdded “Copy URL” for group codes.Added “Add more seats” button on groups dashboard.Added HelpScout integration in admin panel.FixesFixed email validation for new domains.TweaksTweaked course grid title character limit to 50.Tweaked “Back to groups” button as hidden for users with only one group.4.3.9Released Sep 07, 2022FeaturesAdded setting to hide courses associated with the group product on product page.Added setting to hide the group information sticky footer bar on the product page.Updated the group product sticky footer bar to display final group discounted price.FixesSearch and pagination fixes for filtered results on groups dashboard.4.3.8Released Sep 05, 2022FixesFixed total seats and seats left count for groupsFixed addition and removal of group seats from group edit page.Updated group seats calculation logic to consider users enrolled in group by admin from backend.4.3.7Released Aug 04, 2022FixesFixed group seat count edit feature from the group edit screen.4.3.6Released Jul 20, 2022FixesFixed minor UI and styling issues.Updated JS validations while creating and updating sub group.TweaksUpdated class methods to make singleton class controller.Updated class methods to have no HTML and moved them to templates.4.3.5Released Jun 20, 2022FixesFixed freeze first input issue while configuring custom fields.4.3.4Released Jun 14, 2022FeaturesAdded custom field options for user registration through CSV, add new user form and group code registration form.4.3.3Released May 17, 2022FeaturesCompatibility fixes for variable products4.3.2Released Apr 20, 2022FixesFixed subscription warnings thrown for subscriptions that do not have a parent order.Fixed product validation being thrown for resubscription/renewals.Fixed validation bug restricting group creation on group subscription purchases.Fixed loader and button styling on the groups dashboard.Fixed few translation fixes for group stringsFixed updating total seat count on groups created from backend.Fixed loader and button styling on the groups dashboard.Added compatibility for simple variable productsFixes for multisite when adding existing users to group.TweaksUpdated group image template to pass group id as a parameter.4.3.1Released Mar 29, 2022FixesFixes related to compatibility with PHP 8.xFixed the header string formatting in product page sticky footer4.3.0Released Mar 03, 2022FeaturesAdditional groups option for group purchase.FixesFixed price for unlimited members field accepts negative numbers as input.Fixed not able to input value more than 100 for fixed bulk discounts.Fixed infinite loop when trying to upload CSV with users more than group limit.4.2.3Released Sep 16, 2021FixesFixed loading icon issue on reports screen.Fixed sub-group user enrollment issue which removed other users from the group.Fixed rewards column being added multiple times in reports table.Fixed subscription notice on expiration on groups dashboard.Fixed group code registration form displaying multiple times on the page.Added fixes to hide unlimited seats checkbox if individual option chosen on product page.TweaksUpdated template functions to properly filter arguments.Updated hooks to filter localized variables and skip group creation process on order completion.4.2.2Released Jul 06, 2021FeaturesEnforce minimum quantity for group products.Settings to set banner and accent color for the groups dashboard.Settings to set default image for groups and courses to be used on the groups dashboard.FixesFixed hardcoded groups dashboard tab ids issue.Nonce verification for group user removal.Select 2 library UI fixes on sub-group creation/edit page.Fixed fatal error when trying to upload users via CSV.TweaksAdded message for empty group course reports on groups dashboard.Group code registration form design updates.Hide Enroll new user button on groups dashboard if no seats remaining.Added new filter hooks for the sub-groups module.Updated sub-groups design when listing groups on groups dashboard.4.2.1Released May 13, 2021FixesFixed issue with parent group seat limit reducing even for the normal sub-group updateFixed issue with sub-group leaders not being able to see groups on the groups dashboardFixed GDPR links adding slashes.Group leader privilege update to allow image uploads for group image update.Added no group code message fix when adding new group codes from groups dashboard.Fixed bulk discount issue where product id was called incorrectly.Fixed missing translation ready strings.TweaksAdd new user modal to only show 1 user upload box instead of 2.Updated group course reports to show steps instead of lesson count.4.2.0Released Apr 20, 2021FeaturesNew and improved designs for the groups dashboard.Sub-groups feature on the groups dashboard.Bulk discounts for group purchases by woocommerce.Added product setup wizardSecurityPHP v8 support.WordPress 5.7 and LearnDash 3.4.0.x compatibility4.1.5Released Feb 17, 2021FixesRemoved display animation for product single page causing issues with quantity box.Fixed escaping slashes for single quotes when entering group names.Removed utf8 encoding while reading CSV data during CSV uploads.TweaksAdded new filter hooks for group course list and group code form validation.Updated plugin language files.4.1.4Released Jan 21, 2021FixesFixed date format issue causing wrong date displayed for group codes and also updated mailing to allow additional filters.TweaksUpdated quantity box animation to simple transition.Updated seat count updation for unlimited groups.Updated scrolling animation for notificationsAdded additional hidden order item meta to track group purchases to avoid translation conflicts.Added a new filter for tab users and fixed indentation issues.4.1.3Released Dec 09, 2020FeaturesAdded new settings to support GDPR for the group code registration form.FixesFixed group code date validation to check for start of the day for the from and end of day for the to date.Styling fixes for group registration notifications.Fix to clear group code registration form after successful submission.4.1.2Released Oct 22, 2020FixesFixed the infinite loading icon on group reports page while loading student statistics.Fixed a bug with a static recaptcha test key being used instead of the configured one causing recaptcha issues.Fixed an admin privilege check for sending reinvite emails.Fixed group code image and updated the reports image for mobile view.TweaksUpdated group name feature to work with package option used for variable products.Added a fix to support the quick view feature from the neve theme.4.1.1Released Jul 08, 2020FixesAdded a filter hook to the default seat limit when creating a group code and removed hardcoded limit.TweaksAdded setting to select whether to redirect users enrolled from group code to a page or display a custom message.4.1.0Released Jun 04, 2020FeaturesGroup Enrollment Code – Users can add themselves to the groups using enrollment code. Secure, easy to create and manage with expiry dates to the code.A new [ldgr-group-code-registration-form] shortcode to enroll new as well as existing users using group code. A new user can register on the same page using the email address.An option to allow unlimited seats in the group.A placeholder to use in the registration email notification to reset the password.FixesAn issue with default or empty emails being set for emails configured in group registration email settings.TweaksStyling improvements in the group management page.A toggle to enable/disable group registration email notifications.DeprecatedA notice for removing support for EDD after version 4.1.+4.0.2Released Jan 14, 2020TweaksAdded additional hooks and filters to the user registration and enrollment flow.4.0.1Released Dec 25, 2019FixesGroup name support for variable products.TweaksImplemented ajax based batch processing for bulk user CSV uploads.Added hooks to make it more developer friendly4.0Released Oct 22, 2019FeaturesOptimized the bulk user upload process on group registration page.SecurityUpdated the entire plugin structure and also updated coding standards to WordPress.3.8.3Released Sep 10, 2019 FeaturesAdded functionality for bulk user removal request accept and remove for admin3.8.2Released Sep 04, 2019FeaturesCustom group name feature.Ajax based bulk student removalFixesAdded fixes for the hidden group name and description field on group edit page on the admin end.Code optimization for checking empty course lists fetches.TweaksUpdated wdm_modify_total_number_of_registrations hook for additional parameters for order ID.Updated wdm_change_group_quantity hook for additional parameters for order item details.3.8.1Released May 09, 2019FeaturesAjax based user CSV uploadShow detailed course progress report to group leadersSettings in the backend to redirect users on certain pages after login. Role based login redirection.TweaksAdded default messages in email settingsAdded settings link on plugins pageImprove user removal alert messageUpdated the group registration settings on woocommerce product edit page.Changed text select product word to Group on leader pageRemove uppercase transform for header tags3.8.0Released Mar 04, 2019FeaturesDisplay course wise report of group users on Group Registration PageAdded support for resubscribing when a group leader cancels and resubscribes.3.7.0Released Jan 07, 2019FixesMAC users not able to work with CSV enrollment in the group fixedTweaksNew Layout with responsiveness3.6.4Released Nov 13, 2018FeaturesRelated Course selection gets removed on Product saveTweaksAdd a filter to display the Remove button to Group Leader for userSecuritySecurity Update for CSV enrollment3.6.3Released Aug 07, 2018FeaturesAllow Group Leader to reinvite Group UsersDisplay Courses associated with Group on Group Registration PageFixesEnroll user into the course(s) for a variable product for individual purchaseTweaksCompatible with LearnDash WooCommerce Integration version 1.5.03.6.2ReleasedMay 29, 2018SecurityGDPR License Update3.6.1Released May 15, 2018FixesPlugin version number updated3.6.0Released Mar 20, 2018FeaturesOption to make enrolment fees mandatory for Group Leader while purchasing bulk licensesAdmin can set default License Purchase Type as Individual or GroupAdmin can package courses as bundles and set a fixed quantity for purchaseTweaksCompatible with WooCommerce Variable Product typeUpdated .pot file3.5.1Released Jan 30, 2018FeaturesGroup Registration page made responsiveAdded all Group Registration setting on one pageUpdated licensing codeTweaksChanged the sequence of parameters for the wdm_group_registration_label_below_product_name filterAdded missing strings for translation in /languages folder3.5.0Released Dec 12, 2017FeaturesFeature to modify email templates from the LearnDash admin menu3.4.0Released Oct 24, 2017FeaturesOption to purchase for an individual or group on the single product pageAllow group leaders to remove users without admin approvalRestrict group leader from adding new users to the group when existing users are removedFixesResolved the issue with multiple subscriptions3.3.0Released Sep 05, 2017FeaturesAdmin can add multiple group leaders and these group leaders will be able to access the group registration page.3.2.0Released Jul 11, 2017FixesGeneral bug fixes 3.1.1Released Jun 06, 2017FixesResolved issue with function check for subscriptions function3.1.0Released Apr 19, 2017FeaturesPlugin made compatible with LearnDash Zapier IntegrationFixesResolved issue with subscription renewals3.0.0Released Feb 08, 2017FeaturesPlugin made compatible with WooCommerce SubscriptionsTweaksWordPress 4.8 compatible2.1.0Released Jan 17, 2017TweaksCompatible with LearnDash 2.4.2Compatible with WooCommerce 3.0.02.0.2Released Dec 19, 2016FixesResolved plugin dependency issueTweaksUpdated License Integration2.0.1Released Nov 01, 2016TweaksCompatible with LearnDash 2.3.0.22.0.0Released Oct 17, 2016FeaturesPlugin made compatible with Easy Digital Downloads1.2.0Released Sep 28, 2016FeaturesFeature to enable/disable Enable Group Registration option on the Front EndTweaksCompatible with LearnDash 2.2.1.11.1.0Released Jun 28, 2016FeaturesFeature to upload CSV file for adding usersFixesMinor bug fixes related to recently added member not shown in the listFixed the issue regarding the adding Group Leader into the GroupTweaksCompatibility with WordPress 4.5 and LearnDash 2.2Plugin licensing updatedChanged the appearance of the group member list1.0.1Released Mar 22, 2016FeaturesPlugin code made PSR2 compatible1.0.0Released Jan 01, 2016FeaturesPlugin Released